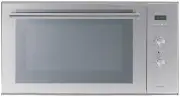
Setting the time - Barazza LAB90 - Manuale d'uso - Pagina 17


Indice:
- Pagina 2 – Complimenti per aver acquistato un forno Barazza!; Informazioni
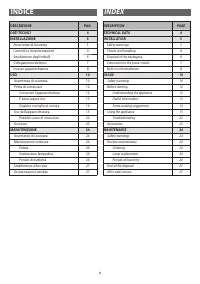
- Pagina 3 – INDICE; INDEX
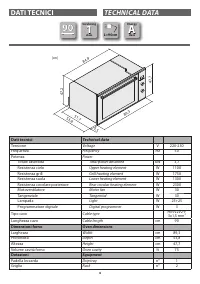
- Pagina 4 – DATI TECNICI; TECHNICAL DATA; Dati tecnici; Technical data; Oven dimensions; Dotazioni; Equipment; cm
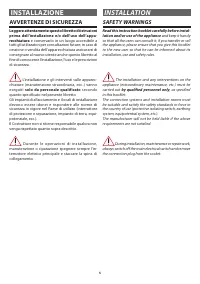
- Pagina 5 – SAFET Y WARNINGS; and keep it handy; INSTALLAZIONE; INSTALLATION; AVVERTENZE DI SICUREZZA; e conservarlo in un luogo accessibile a; solo da personale qualificato; secondo
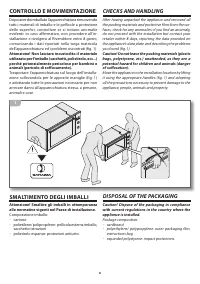
- Pagina 6 – CHECKS AND HANDLING; and adopting; DISPOSAL OF THE PACKAGING; instructions bag; CONTROLLO E MOVIMENTAZIONE; Composizione imballo:
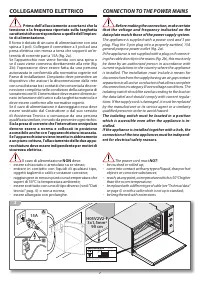
- Pagina 7 – CONNECTION TO THE POWER MAINS; Before making the connection, make certain; COLLEGAMENTO ELETTRICO; Prima dell’allacciamento accertarsi che la; Il cavo di alimentazione; NON; oggetti taglienti o caldi e sostanze corrosive
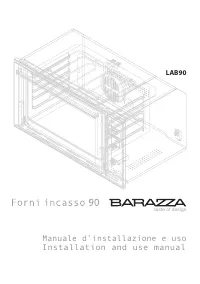
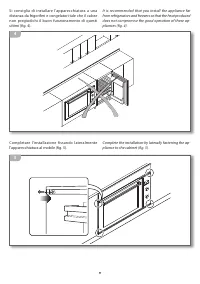
- Pagina 8 – INCASSO APPARECCHIATURA; Accertarsi del perfetto stato e della stabilità; BUILT-IN UNIT INSTALLATION; Make certain that the cabinet in which you
- Pagina 10 – USO; USAGE; PER UN USO CORRETTO E SICURO; FOR SAFE AND CORRECT USE
- Pagina 11 – PER LA COTTURA; Pericolo di scottature!; Sorvegliare l’apparecchiatura durante tutto il; FOR COOKING; Monitor the appliance during the entire time it
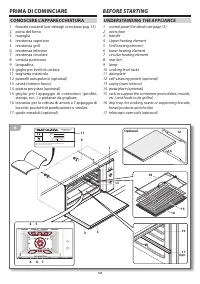
- Pagina 12 – BEFORE STARTING; UNDERSTANDING THE APPLIANCE; PRIMA DI COMINCIARE; CONOSCERE L’APPARECCHIATURA
- Pagina 13 – É BENE SAPERE CHE; USEFUL INFORMATION; the data plate (for its position see
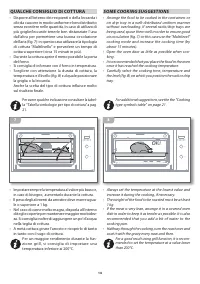
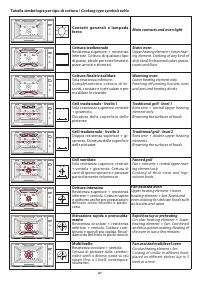
- Pagina 14 – QUALCHE CONSIGLIO DI COTTURA; “Tabella simbologie per tipo di cottura” a pag.; SOME COOKING SUGGESTIONS; “Cooking
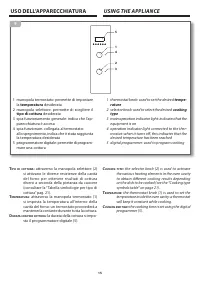
- Pagina 15 – USO DELL’APPARECCHIATURA; USING THE APPLIANCE; temperatura; rature
- Pagina 16 – t *G UIF BDPVTUJD TJHOBM UIBU JOEJDBUFT UIF FOE PG; t *G UIFSF JT B QPXFS GBJMVSF XIJMF UIF PWFO JT PQFSBUJOH; Prima di iniziare è bene sapere che; t 6OTFHOBMFBDVTUJDPQFSDJSDBNJOVUJTFHOBMBJM; t 4FEVSBOUFJMGVO[JPOBNFOUPEFMGPSOPEPWFTTFNBO; Descrizione comandi; Description commands
- Pagina 17 – Setting the time
- Pagina 18 – B) Manual cooking with a timer
- Pagina 19 – B) Programmed end of cooking time
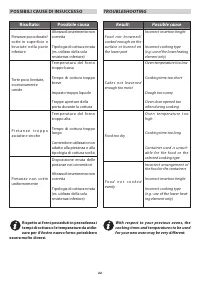
- Pagina 22 – POSSIBILI CAUSE DI INSUCCESSO; TROUBLESHOOTING; essere molto diversi.; With respect to your previous ovens, the; Possibile causa; Impasto troppo liquido; Possible cause
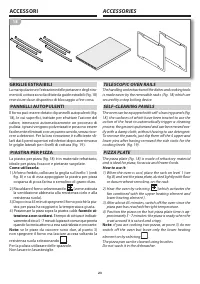
- Pagina 23 – ACCESSORIES; ACCESSORI; GRIGLIE ESTRAIBILI; vedi; tenzione a non scottarsi.; TELESCOPIC OVEN RAILS
- Pagina 24 – Chiudere sempre l’interruttore elettrico; MANUTENZIONE ORDINARIA; PULIZIA; Superfici inox e in cristallo:; Always switch off the main electrical switch; ROUTINE MAINTENANCE; CLEANING; Stainless steel and glass surfaces:; MANUTENZIONE; MAINTENANCE
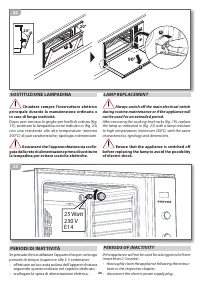
- Pagina 26 – LAMP REPLACEMENT; Ensure that the appliance is switched off; PERIODS OF INACTIVIT Y; t UIPSPVHIMZDMFBOUIFBQQMJBODFGPMMPXJOHUIFJOTUSVD; SOSTITUZIONE LAMPADINA; PERIODI DI INATTIVITÀ; t FGGFUUVBUFVOBDDVSBUBQVMJ[JBEFMMBQQBSFDDIJBUVSB
- Pagina 27 – SMALTIMENTO A FINE VITA; Rendere inutilizzabile l’apparecchiatura per lo; ASSISTENZA POST VENDITA; Procedura in caso di malfunzionamento; t SFQFSJSFMBEBUBEJBDRVJTUPEFMMBQQBSFDDIJBUVSB; Attenzione! In attesa della risoluzione del; Before disposing of the appliance, render it
17
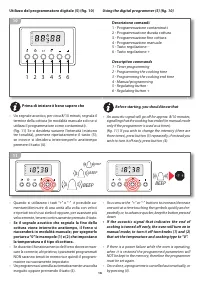
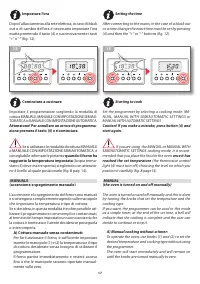
Impostare l’ora
Dopo l’allacciamento alla rete elettrica, in caso di black
out o di cambio dell’ora è necessario impostare l’ora
esatta premendo il tasto (4) e successivamente i tasti
“+” o “-”
(fig. 12)
.
A
U
T
O
P
A
U
O
P
A
U
T
O
P
12
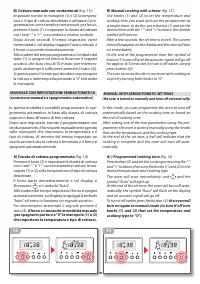
Cominciare a cucinare
Impostare il programmatore scegliendo la modalità di
cottura MANUALE, MANUALE CON IMPOSTAZIONE SEMIAU-
TOMATICA o MANUALE CON IMPOSTAZIONE AUTOMATICA.
Attenzione! Per annullare un errore di programma-
zione premere il tasto (4) e ricominciare.
Se si utilizzano le
modalità di cottura MANUALE
o MANUALE CON IMPOSTAZIONE SEMIAUTOMATICA,
è
consigliabile infornare le pietanze
quando il forno ha
raggiunto la temperatura impostata
(la spia termo-
stato (4) deve essere spenta) scegliendo con attenzio-
ne il livello al quale posizionarle
(fig. 8 pag. 14).
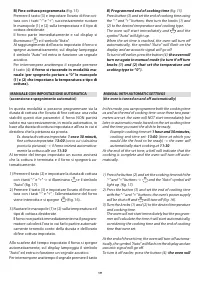
MANUALE
(accensione e spegnimento manuale)
L’accensione e lo spegnimento del forno sono manuali
e si ottengono semplicemente agendo sulle manopole
che impostano la temperatura e tipo di cottura.
Se si desidera, in questa modalità è inoltre possibile uti-
lizzare il programmatore come semplice contaminuti;
al termine del tempo impostato un suono avviserà che
la cottura è terminata e l’utente deciderà se proseguirla
o interromperla.
A)
Cottura manuale senza contaminuti:
Per far funzionare il forno, è sufficiente impostare
tramite le manopole (1) e (2) la temperatura e il tipo
di cottura desiderate senza bisogno di utilizzare il
programmatore.
Il forno partirà immediatamente e resterà acceso
fino a che le manopole saranno riportate manual-
mente sullo zero.
Setting the time
After connecting to the mains, in the case of a black out
or a time change the exact time must be set by pressing
BOEUIFOUIFiwPSiwCVUUPOT
(fig. 12)
.
A
U
T
O
P
A
O
P
A
U
T
O
P
13
Starting to cook
Set the programmer by selecting a cooking mode: MA-
NUAL, MANUAL WITH SEMIAUTOMATIC SET TINGS or
MANUAL WITH AUTOMATIC SETTINGS
Caution! If you make a mistake, press button (4) and
start again.
If you are using the MANUAL or MANUAL WITH
SEMIAUTOMATIC SETTINGS cooking mode, it is recom-
mended that you place the food in the oven
once it has
reached the set temperature
(the thermostat control
light (4) must turn off ) choosing the level on which you
position it carefully
(fig. 8 page14)
.
MANUAL
(the oven is turned on and off manually)
The oven is turned on and off manually and this is done
by turning the knobs that set the temperature and the
cooking type.
If you want, the programmer can be used in this mode
as a simple timer; at the end of the set time, a bell will
indicate that the cooking is complete and the user can
decide to continue or stop it.
A) Manual cooking without a timer:
To operate the oven, use knobs (1) and (2) to set the
desired temperature and cooking type without using
the programmer.
The oven will start immediately and will remain on
until the knobs are turned manually to zero.
"Caricamento dell'istruzione" significa che è necessario attendere finché il file non è caricato e pronto per la lettura online. Alcune istruzioni sono molto grandi e il tempo di caricamento dipende dalla velocità della tua connessione a Internet.
Sommario
2 Complimenti per aver acquistato un forno Barazza! Questa è un’apparecchiatura di grande qualità in grado di accompagnarvi nel Vostro lavoro per lungo tempo in modo affidabile e sicuro fornendo presta-zioni di altissimo livello. L’installazione e l’uso dell’apparecchiatura è semplice e immediato. V...
3 DESCRIZIONE PAG. DATI TECNICI 4 INSTALLAZIONE 5 Avvertenze di sicurezza 5 Controllo e movimentazione 6 Smaltimento degli imballi 6 Collegamento elettrico 7 Incasso apparecchiatura 8 USO 10 Avvertenze di sicurezza 10 Prima di cominciare 12 Conoscere l’apparecchiatura 12 É bene sapere che 13...
4 DATI TECNICI TECHNICAL DATA Dati tecnici Technical data Tensione Voltage V 220-230 Frequenza Frequency Hz 50 Potenza Power Totale assorbita Total power absorbed kW 3,7 Resistenza cielo Upper heating element W 1100 Resistenza grill Grill heating element W 1750 Resistenza suola Lower heating ele...
Altri modelli di forni Barazza
-
 Barazza 1FVLTB
-
 Barazza 1FVLTBD
-
 Barazza 1FVLTBM
-
 Barazza 1FVLTBS
-
 Barazza 1FVLTIM
-
 Barazza 1FVLTIMD
-
 Barazza 1FVLTIMDI
-
 Barazza 1FVLTIMI
-
 Barazza 1FVLTIMS
-
 Barazza 1FVLTIMSI