TARATURA BASE DELLA MACCHINA; Prima fase di taratura: correzione squilibrio albero.; BASIC MACHINE CALIBRATION; First stage of calibration: shaft imbalance correction. - Solo 155 - Manuale d'uso - Pagina 28


Indice:
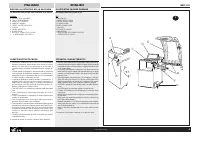
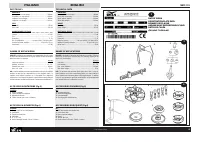
- Pagina 3 – DISEGNO ILLUSTRATIVO DELLA MACCHINA; ILLUSTRATIVE MACHINE DRAWING; TECHNICAL CHARACTERISTICS; D E
- Pagina 5 – DATI TECNICI; ÄÀÍÍÛÅ ÒÀÁËÈ÷ÊÈ; TECHNICAL DATA
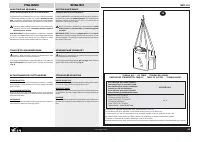
- Pagina 7 – DISIMBALLO; » DIMENSIONI D’INGOMBRO:; UNPACKING; » OVERALL DIMENSIONS:
- Pagina 9 – INSTALLAZIONE; COLLEGAMENTO ELETTRICO; INSTALLATION; ELECTRICAL CONNECTION
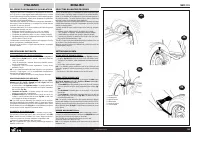
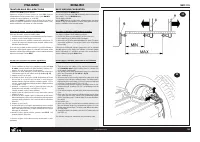
- Pagina 11 – INSTALLAZIONE FLANGIA; MONTAGGIO FLANGE; FITTING ADAPTERS; » Fig.10c shows the system for locking automobile wheels using the
- Pagina 13 – INSTALLAZIONE FLANGIA PNEUMATICA; FITTING THE PNEUMATIC ADAPTER
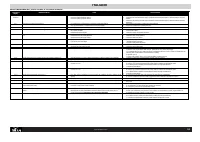
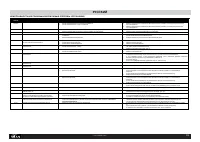
- Pagina 15 – MALFUNZIONAMENTI, LORO CAUSE E POSSIBILI RIMEDI; ITALIANO
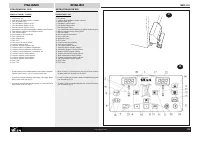
- Pagina 17 – ISTRUZIONI PER L’USO; PANNELLO COMANDI - LEGENDA; INSTRUCTIONS FOR USE
- Pagina 19 – EQUILIBRATURA RUOTE; Accendere la macchina mediante l’interruttore principale.; WHEEL BALANCING; Switch on the machine with the main switch.; EQUILIBRAGE DES ROUES; Allumer la machine par l’interrupteur principal.
- Pagina 20 – SELEZIONE PROGRAMMA DI EQUILIBRATURA
- Pagina 24 – PROGRAMMA DI SEPARAZIONE DEI PESI
- Pagina 26 – OTTIMIZZAZIONE SQUILIBRIO
- Pagina 27 – CONFIGURAZIONE EQUILIBRATRICE
- Pagina 28 – TARATURA BASE DELLA MACCHINA; Prima fase di taratura: correzione squilibrio albero.; BASIC MACHINE CALIBRATION; First stage of calibration: shaft imbalance correction.
- Pagina 31 – AUTODIAGNOSI; on si la pédale est tirée vers le haut et oFF si la pédale est à repos
- Pagina 32 – UTILIZZO PROGRAMMA ALUDATA; START, en commençant ainsi le cycle de mesure.
- Pagina 33 – TABELLA OLII / OIL TABLE / TABLEAU DES HUILES; Ñìàçî÷íîå ìàñëî äëÿ ïíåâìàòè÷åñêîé ñèñòåìû; ESSO FEBIS K 32
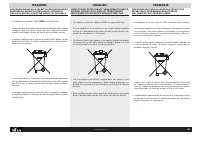
- Pagina 35 – » E’ obbligatorio non smaltire i RAEE (WEEE) come rifiuti urbani.
- Pagina 36 – ASSISTENZA TECNICA E PARTI DI RICAMBIO; TECHNICAL ASSISTANCE AND SPARE PARTS
- Pagina 38 – Declaración de Conformidad CE; persona autorizzata a costituire il fascicolo tecnico/; SICAM; person authorized to compile the technical file/; Marco Matteucci; Via della Costituzione 49
ITALIANO
ENGLISH
SBM 155
36
COD. 655632 Rev.0
24
25
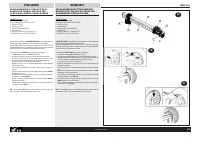
TARATURA BASE DELLA MACCHINA
Premere il tasto MENÙ e tenerlo premuto.
A p p e n a s u l d i s p l a y d i s i n i s t r a c o m p a r e l a s c i t t a C A L r i l a s c i a r e
immediatamente il tasto e premere (entro 1,5sec) il tasto MM/INCH.
Il display di sinistra visualizzerà la scritta C-1.
Tramite il tasto MENU’ è possibile scorrere all’interno dei vari menu di
taratura e scegliere di effettuare la correzione squilibrio albero, l’auto-
taratura equilibratrice e la taratura dei calibri automatici.
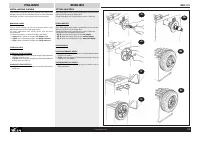
Prima fase di taratura: correzione squilibrio albero.
Prima fase di taratura: correzione squilibrio albero.
1 - Smontare la ruota e la flangia a coni eventualmente presente sull’albero;
2 - eseguire un lancio (senza flangia e senza ruota);
3 - al termine del lancio lo squilibrio misurato viene memorizzato; ciò
consente di compensare elettronicamente eventuali squilibri residui
dell’albero della macchina.
Se la macchina è dotata di calibri automatici è possibile effettuare la
taratura dei calibri quando compare la scritta d-1 (vedi taratura calibro
automatico), altrimenti è possibile proseguire con la seconda fase di taratura
della macchina tramite il tasto MENU’.
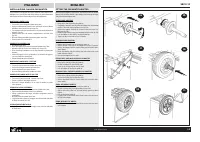
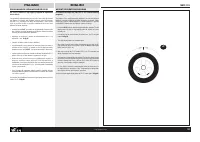
Seconda fase di taratura: auto-taratura equilibratrice.
Ora il display di sinistra mostra la scritta C-2.
1 - Fissare saldamente la flangia a coni sull’albero e montare una ruota
di vettura in buone condizioni di medie dimensioni (larghezza 5.5",
diametro 14") sulla flangia stessa fissandola bene;
2 - impostare con molta attenzione le misure della ruota utilizzando le
corrispondenti coppie di tasti (indicate con 4, 5, 6 e 10 in fig. 18);
3 - eseguire un lancio con la ruota;
4 - al termine del lancio la macchina richiede l’impostazione del valore
del peso per le successive fasi di taratura; il valore proposto
automaticamente è 60g se la macchina è settata in grammi, 3.50 se
è in once e viene visualizzato sul display di destra: il dispaly visualizza
C-3 60 oppure C-3 2.00;
5 - modificare, se necessario, il valore in grammi del peso scelto per
l’autotaratura ruota utilzzando i tasti indicati +/- (5 fig. 18);
il display di destra mostra il valore modificato;
6 - apporre il peso del valore prescelto sul lato interno della ruota ed
eseguire un lancio;
7 - al termine del lancio togliere il peso di calibrazione dal lato interno
della ruota ed apporlo sul lato esterno nella posizione simmetricamente
opposta (il display visualizza C-4 ed il valore del peso di calibrazione
prescelto);
8 - eseguire un nuovo lancio;
9 - al termine del lancio occorre girare manualmente la ruota in modo da
portare il peso di calibrazione in posizione perpendicolare ad ore 6 (in
basso sotto l’albero principale); il display visualizza C-5 ed il valore
dell’angolo di calibrazione;
10- tenendo la ruota in questa posizione, premere il tasto SPLIT (che
presenta entrambi i led accesi).
La taratura eseguita viene automaticamente memorizzata in modo
permanente.
BASIC MACHINE CALIBRATION
Press and hold down the MENU button.
As soon as the left display reads CAL immediately release the button and
press (within 1.5 sec) the MM/INCH button.
The left display reads C-1.
Use the MENU button to scroll the various calibration menus and choose
whether to carry out shaft imbalance correction, wheel balancer self-cali-
bration, or calibration of the automatic gauges.
First stage of calibration: shaft imbalance correction.
First stage of calibration: shaft imbalance correction.
1 - Demount the wheel and cone adapter if present on the shaft..
2 - Run a balancing cycle (without wheel and adapter).
3 - At the end of the cycle the measured imbalance is saved. This allows
any residual imbalance in the machine’s shaft to be compensated
electronically.
If the machine is fitted with automatic gauges these can be calibrated
when d-1 appears on the display (see calibration of automatic gauges
section), alternatively it is possible to proceed to the second stage of
machine calibration using the MENU button.
Second stage of calibration: wheel balancer self-calibration.
Now the left display reads C-2.
1 - Tightly fasten the cone adapter on the shaft and mount a medium-
sized automobile wheel in good condition (width 5.5", diameter 14")
on the adapter, fastening well.
2 - Very carefully set the wheel measurements using the corresponding
pair of keys (indicated by 4, 5, 6, and 10 in fig. 18).
3 - Run a measuring cycle.
4 - At the end of the cycle the machine requests the setting of the weight
to be used for the subsequent calibration stages. The default figure is
60g if the machine is set to grams, 3,50 if set to ounces and displayed
on the right. The displays read C-3 60 or C-3 2.00.
5 - If necessary change the figure in grams to the weight chosen for self-
calibration using the +/- buttons (5 fig. 18). The right display shows the
new figure.
6 - Fit the selected weight on the inside of the wheel and run a measuring
c y c l e .
7 - At the end of the cycle remove the calibration weight from the inside
of the wheel and fit it on the outside in the symmetrically opposite
position (the display reads C-4 with the figure for the selected calibra-
tion weight).
8 - Run another cycle.
9 - At the end of the cycle the wheel must be manually rotated so as to
bring the calibration weight into a perpendicular position at 6 o’clock
(bottom, below the main shaft). The display reads C-5 and the calibra-
tion angle figure.
10- Keeping the wheel in this position, press the SPLIT button (which has
both LED’s on).
The calibration settings are automatically and permanently saved.
"Caricamento dell'istruzione" significa che è necessario attendere finché il file non è caricato e pronto per la lettura online. Alcune istruzioni sono molto grandi e il tempo di caricamento dipende dalla velocità della tua connessione a Internet.
Sommario
ITALIANO ENGLISH SBM 155 4 COD. 655632 Rev.0 1 DISEGNO ILLUSTRATIVO DELLA MACCHINA con indicazione delle principali parti componenti ai fini dell’uso LEGENDAA: INTERRUTTORE GENERALEB: CAVO DI ALIMENTAZIONEC: CRUSCOTTO PORTAPESID: PANNELLO COMANDIE: CARTER PROTEZIONE RUOTAF : FLANGIAG. CALIBRI AUTOMA...
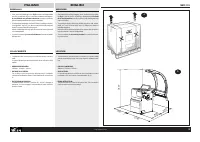
ITALIANO ENGLISH SBM 155 6 COD. 655632 Rev.0 DATI TECNICI DIMENSIONIAltezza Max (con carter aperto) ............................................... 1800mmProfondità (con carter aperto) ................................................ 1260mmLarghezza (senza flangia) .....................................
ITALIANO ENGLISH SBM 155 8 COD. 655632 Rev.0 1800 900 500 1260 500 5 DISIMBALLO » Dopo avere tolto l’imballaggio (ved. fig.5) assicurarsi del’integrità della macchina controllando che non vi siano parti visibilmente danneggiate.In caso di dubbio non utilizzare la macchina e rivolgersi a personalepro...