Canon IXUS Concept Arancia- Manuale d'uso

Canon IXUS Concept Arancia– Manuale d'uso, leggi gratuitamente online in formato PDF. Speriamo che questo ti aiuti a risolvere eventuali dubbi. Se hai ulteriori domande, contattaci tramite il modulo di contatto.


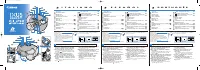

1 Push the bottom cover lock tab
@8
in the
direction indicated by the arrow to open the
bottom cover
@7
.
2 Open the battery cover
@4
and load the battery.
The camera uses one CR2 type lithium battery.
When
blinks on the LCD panel
y
, replace
the battery.
3 Turn the film cartridge compartment cover lever
@6
in the direction indicated by the arrow and
open the film cartridge compartment cover
@5
.
4 Insert the film cartridge and close the film
cartridge compartment cover and close the
bottom cover.
Check that the visual exposure indicator of film is
(unexposed).
5 Slide the main switch
!1
downwards to turn
the camera on.
The lens cover opens.
6 Select the print type with the print type
selection lever
@2
.
You can choose from three print types: C print, H
print or P print.
7 Place the AF mark over the subject and
press the shutter button
r
.
8 When the film cartridge has finished and
the film has rewound, remove the film
cartridge from the camera.
The visual exposure indicator of film will be
(exposed).
E
N
G
L
I
S
H
Nomenclature
AF Sensor
Viewfinder Window
AF Emitter
Shutter Button . . . . . . . . . . . . . . . . . . . . . . . .
¡
Light Metering Window
LCD Panel
SET Button . . . . . . . . . . . . . . . . . . . . . . . . .
¢∞
SELECT Button . . . . . . . . . . . . . . . . . . . . . .
¢§
Flash
Red-eye Reduction Lamp . . . . . . . . . . . . . .
™£
Main Switch . . . . . . . . . . . . . . . . . . . . . . . . . .
¡
Lens
Focal Length
DATE Button . . . . . . . . . . . . . . . . . . . . . . . .
¢∞
Self-timer Button . . . . . . . . . . . . . . . . . . . .
£
TITLE (Title selection) Button . . . . . . . . . . . .
§
Mid-roll Rewind Button
Flash Mode Button . . . . . . . . . . . . . . . . .
™
Orange Indicator
Green Indicator
Viewfinder
Print Type Selection Lever . . . . . . . . . . . . . . .
¡
Strap Mount
Battery Cover . . . . . . . . . . . . . . . . . . . . . . . . .
¡
Film Cartridge Compartment Cover . . . . . . .
¡
Film Cartridge Compartment Cover Lever . .
¡
Bottom Cover . . . . . . . . . . . . . . . . . . . . . . . . .
¡
Bottom Cover Lock Tab . . . . . . . . . . . . . . . . .
¡
Green and Orange indicators
Green indicator
Lit: Camera is focused (ready to shoot)
Blinking: Proximity warning
* If the proximity warning appears, move away
from the subject until the indicator stops
blinking and press the shutter button again.
Orange indicator
Lit: Flash has charged
Blinking (4 times/sec): Camera shake warning
Viewfinder
The viewfinder field changes when you switch
@2
. The
black areas will not be printed.
C
H
P
AF
mark
See the nomenclature for the number in the circle.
1
2
3
4
5
6
7
8
9
10
11
12
13
14
15
16
17
18
19
20
21
25
24
22
23
26
27
28
1
Basic Operations
1 Poussez la languette de verrouillage du
couvercle du fond
@8
dans la direction indiquée
par la flèche pour ouvrir le couvercle du fond
@7
.
2 Ouvrez le couvercle de logement de pile
@4
et
chargez la pile.
L’appareil photo utilise une pile au lithium de type CR2.
Lorsque
clignote sur le panneau LCD
y
,
remplacez la pile.
3 Tournez le levier du couvercle du logement
de cartouche de film
@6
dans le sens indiqué
par la flèche et ouvrez le couvercle du
logement de cartouche de film
@5
.
4 Insérez la cartouche de film et fermez le
couvercle du logement de cartouche de film,
puis le couvercle du fond.
Vérifiez si l’indicateur d’exposition visuel est
(non exposé).
5 Déplacez l’interrupteur principal
!1
vers le
bas pour mettre l’appareil photo sous
tension.
Le bouchon d’objectif s’ouvre.
6 Sélectionnez le type d’impression avec le
levier de sélection du type d’impression
@2
.
Vous pouvez choisir l’un des trois types
d’impression suivants: impression C, impression
H ou impression P.
7 Placez la marque AF sur le sujet et appuyez
sur le déclencheur
r
.
8 Lorsque la cartouche de film est terminée et
que le film est rembobiné, retirez la
cartouche de film de l’appareil photo.
L’indicateur d’exposition visuel est
(exposé).
F
R
A
N
Ç
A
I
S
Nomenclature
Témoins vert et orange
Témoin vert
Allumé: L’appareil photo est au point
(prêt à prendre la photo)
Clignote: Avertissement de rapprochement excessif
* Si le témoin de rapprochement excessif apparaît,
éloignez-vous du sujet jusqu’à ce que le témoin s’arrête
de clignoter et appuyez de nouveau sur le déclencheur.
Témoin orange
Allumé: Le flash est en cours de chargement.
Clignote (4 fois/seconde): Avertissement de tremblement de l’appareil
Viseur
Le champ du viseur se modifie lorsque vous passez
@2
.
Les zones noires ne sont pas imprimées.
Impression
C
Impression
H
Impression
P
Marque
AF
Reportez-vous à la nomenclature pour le chiffre encerclé.
1
2
3
4
5
6
7
8
9
10
11
12
13
14
15
16
17
18
19
20
21
25
24
22
23
26
27
28
1
Opérations de base
1 Drücken Sie die Bodendeckel-Sperre
@8
in
Pfeilrichtung, um den Bodendeckel
@7
zu
öffnen.
2 Öffnen Sie den Batteriefachdeckel
@4
, und legen
Sie die Batterie ein.
Die Kamera arbeitet mit einer CR2-Lithiumbatterie.
Wenn
auf dem Display
y
blinkt, ersetzen
Sie die Batterie durch eine frische.
3 Drehen Sie den Filmkassettenfachdeckel-
Hebel
@6
in Pfeilrichtung, und öffnen Sie den
Filmkassettenfachdeckel
@5
.
4 Legen Sie die Filmkassette ein, und schließen
Sie dann den Filmkassettenfachdeckel und
den Bodendeckel.
Vergewissern Sie sich, daß die Belichtungsanzeige
des Films auf
(unbelichtet) steht.
5 Schieben Sie den Hauptschalter
!1
nach
unten, um die Kamera einzuschalten.
Die Objektivabdeckung öffnet sich dabei.
6 Wählen Sie mit dem Bildformat-Wählhebel
@2
das gewünschte Bildformat.
Sie können eines der folgenden drei Bildformate
wählen: C-Abzug, H-Abzug oder P-Abzug.
7 Richten Sie die Autofokusmarke auf das Motiv,
und drücken Sie dann den Auslöser
r
.
8 Sobald der Film nach der letzten Aufnahme
zurückgespult wurde, nehmen Sie die
Kassette aus der Kamera.
Die Belichtungsanzeige des Films steht nun auf
(belichtet).
D
E
U
T
S
C
H
Teilebezeichnungen
Empfänger für automatische Scharfeinstellung
Sucher
Sender für automatische Scharfeinstellung
Auslöser . . . . . . . . . . . . . . . . . . . . . . . . . . . .
¡
Meßzelle für automatische Belichtung
Display
SET-Taste . . . . . . . . . . . . . . . . . . . . . . . . . .
¢∞
SELECT-Taste . . . . . . . . . . . . . . . . . . . . . .
¢§
Blitz
Lampe für Rote-Augen-Reduzierung . . . .
™£
Hauptschalter . . . . . . . . . . . . . . . . . . . . . . . .
¡
Objektiv
Brennweite
DATE-Taste . . . . . . . . . . . . . . . . . . . . . . . . .
¢∞
Taste für Selbstauslöser . . . . . . . . . . . . . .
£
TITLE-Taste (Titelauswahl) . . . . . . . . . . . . . .
§
Rückspultaste
Blitzbetriebsart-Taste . . . . . . . . . . . . . .
™
Orangefarbene Anzeigelampe
Grüne Anzeigelampe
Sucher
Bildformat-Wählhebel . . . . . . . . . . . . . . . . . .
¡
Öse für Trageschlaufe
Batteriefachdeckel . . . . . . . . . . . . . . . . . . . .
¡
Filmkassettenfachdeckel . . . . . . . . . . . . . . .
¡
Filmkassettenfachdeckel-Hebel . . . . . . . . . .
¡
Bodendeckel . . . . . . . . . . . . . . . . . . . . . . . . .
¡
Bodendeckel-Sperre . . . . . . . . . . . . . . . . . . .
¡
Grüne und orangefarbene Anzeigelampe
Grüne Anzeigelampe
Leuchtet: Objektiv ist scharfgestellt (Kamera
ist aufnahmebereit)
Blinkt: Entfernungswarnung
* Wenn eine Entfernungswarnung gegeben wird, entfernen
Sie sich vom Motiv, bis das Blinken der Anzeige stoppt,
und drücken dann den Auslöser ein weiteres Mal.
Orangefarbene Anzeigelampe
Leuchtet: Blitz ist geladen
Blinkt (4mal/s): Verwackelungswarnung
Sucher
Wenn Sie
@2
verstellen, ändert sich der Bildausschnitt im
Sucher entsprechend. Die schwarzen Flächen im Sucher
bleiben unbelichtet.
C
-Abzug
H
-Abzug
P
-Abzug
A
uto
f
okusmarke
Die in Kreisen stehenden Nummern entsprechen den Nummern in der Übersicht "Teilebezeichnungen".
1
2
3
4
5
6
7
8
9
10
11
12
13
14
15
16
17
18
19
20
21
25
24
22
23
26
27
28
1
Grundlegende Bedienung
DATE
TITLE
C
H
P
1
2
3
4
5
6
7
8
9
10
11
12
14
15
16
17
18
19
20
21
25
24
22
23 26
13
27
28
Faisceau récepteur AF
Fenêtre de viseur
Faisceau émetteur AF
Déclencheur . . . . . . . . . . . . . . . . . . . . . . . . . .
¡
Fenêtre de posemètre
Panneau LCD
Touche SET (de réglage) . . . . . . . . . . . . . .
¢∞
Touche SELECT . . . . . . . . . . . . . . . . . . . . .
¢§
Flash
Lampe d’atténuateur d’yeux rouges . . . . .
™£
Interrupteur principal . . . . . . . . . . . . . . . . . . .
¡
Objectif
Longueur focale
Touche DATE . . . . . . . . . . . . . . . . . . . . . . . .
¢∞
Touche de retardateur . . . . . . . . . . . . . . . .
£
Touche TITLE (sélection d’un titre) . . . . . . . .
§
Touche de rembobinage à mi-course
Touche de mode de flash . . . . . . . . . . .
™
Témoin orange
Témoin vert
Viseur
Levier de sélection du type d’impression . . .
¡
Monture de dragonne
Couvercle de logement de pile . . . . . . . . . . .
¡
Couvercle du logement de cartouche de film . .
¡
Levier du couvercle de logement de cartouche de film
¡
Couvercle du fond . . . . . . . . . . . . . . . . . . . . .
¡
Languette de verrouillage du couvercle du fond
¡
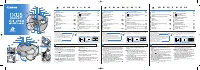
Viewfinder
Viseur
Sucher
CT1-7469-001
PRINTED IN MALAYSIA
K156 16-10-2002 09:05 Page 1
"Caricamento dell'istruzione" significa che è necessario attendere finché il file non è caricato e pronto per la lettura online. Alcune istruzioni sono molto grandi e il tempo di caricamento dipende dalla velocità della tua connessione a Internet.