Pagina 1 - “IMPORTANTI ISTRUZIONI DI SICUREZZA”; PERICOLO –; “CONSERVATE QUESTE ISTRUZIONI”
“IMPORTANTI ISTRUZIONI DI SICUREZZA” Quando usate la macchina per cucire, rispettate sempre le precauzioni di sicurezza, incluso quanto qui di seguito specificato. “Leggete tutte le istruzioni prima dell’uso.” PERICOLO – Per ridurre il rischio di shock elettrico. 1. La macchina per cucire non deve e...
Pagina 2 - LEGGERE PRIMA DELL’USO DI QUESTA MACCHINA
LEGGERE PRIMA DELL’USO DI QUESTA MACCHINA Per un funzionamento sicuro 1. Mentre si cuce guardare sempre l’ago. Non toccare il volantino, il tendifilo, l’ago o le altre parti mobili.2. Ricordarsi di spegnere l’interruttore generale e di staccare il cavo quando: • si è completata un’operazione• si sos...
Pagina 3 - INDICE DEGLI ARGOMENTI
INDICE DEGLI ARGOMENTI CONOSCERE LA MACCHINA DA CUCIRE PARTI PRINCIPALI ............................................................ 2ACCESSORI ...................................................................... 4 Accessori opzionali ................................................. 4 FUNZIONAMEN...
Pagina 4 - PARTI PRINCIPALI; ELEMENTOS PRINCIPALES
2 KNOWING YOUR SEWING MACHINE CONOZCA SU M Á QUINA DE COSER CONOSCERE LA MACCHINA DA CUCIRE PARTI PRINCIPALI 1 DISPOSITIVO DI AVVOLGIMENTO SPOLINA (Pagina 28) Per avvolgere il rocchetto con il filo da utilizzare inferiormente. 2 SELETTORE DELLA LUNGHEZZA DEL PUNTO (Pagina 14, 25) Permette di regolar...
Pagina 5 - ACCESSORI; ACCESORIOS; Accesorios opcionales; Accessori opzionali
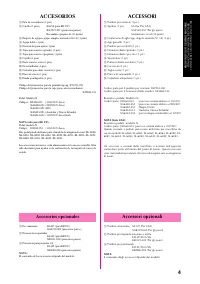
4 KNOWING YOUR SEWING MACHINE CONOZCA SU M Á QUINA DE COSER CONOSCERE LA MACCHINA DA CUCIRE ACCESSORI 1 Piedino per cerniere (1 pz.) 2 Spoline (3 pz.) SA156 (Per USA)XA5539-051 (Per gli paesi)Sostituzioni (set di 10 pezzi) 3 Confezione di aghi (ago singolo normale N ° 14) (3 pz.) 4 Ago gemello (1 pz...
Pagina 6 - FUNZIONAMENTO DELLA; Collegamento elettrico; AVVERTENZA; FUNCIONAMIENTO DE LA; Conexión de los enchufes; AVISO
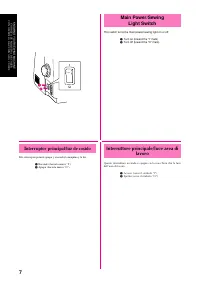
6 KNOWING YOUR SEWING MACHINE CONOZCA SU M Á QUINA DE COSER CONOSCERE LA MACCHINA DA CUCIRE FUNZIONAMENTO DELLA MACCHINA DA CUCIRE Collegamento elettrico 1. Inserire il connettore del cavo di alimentazione nella macchina da cucire. 2. Inserire la spina di alimentazione in una presa elettrica a muro....
Pagina 8 - PRECAUCIÓN; Foot Controller; CAUTION; Reostato a pedale; ATTENZIONE
8 KNOWING YOUR SEWING MACHINE CONOZCA SU M Á QUINA DE COSER CONOSCERE LA MACCHINA DA CUCIRE Pedal Al presionar ligeramente el pedal, la máquina funcionará a baja velocidad.Al aumentar la presión, se incrementa también la velocidad de la máquina.Al soltar el pedal, la máquina se para. Asegúrese siemp...
Pagina 9 - Controllo dell’ago; Sostituzione dell’ago; Verificación de la aguja; Cambio de la aguja
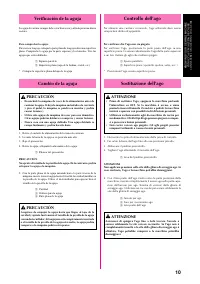
10 KNOWING YOUR SEWING MACHINE CONOZCA SU M Á QUINA DE COSER CONOSCERE LA MACCHINA DA CUCIRE Controllo dell’ago Per ottenere una cucitura scorrevole, l’ago utilizzato deve esseresempre ben diritto ed appuntito. Per verificare che l’ago non sia piegato: Per verificare l’ago, posizionare la parte pian...
Pagina 10 - Changing the Presser Foot; Cambio del prensatelas; Sostituzione del piedino premistoffa
11 KNOWING YOUR SEWING MACHINE CONOZCA SU M Á QUINA DE COSER CONOSCERE LA MACCHINA DA CUCIRE Changing the Presser Foot CAUTION • Always turn off the power before changing the presserfoot. If the power is on and controller is stepped on, themachine will start and may cause injury. • Always use the co...
Pagina 11 - Flat Bed Attachment
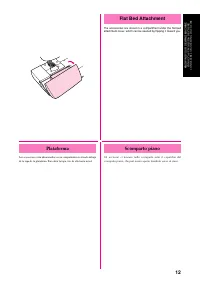
12 KNOWING YOUR SEWING MACHINE CONOZCA SU M Á QUINA DE COSER CONOSCERE LA MACCHINA DA CUCIRE Flat Bed Attachment The accessories are stored in a compartment under the flat bedattachment cover, which can be opened by flipping it toward you. Plataforma Los accesorios están almacenados en un compartimi...
Pagina 12 - DISTINTOS MANDOS; DISPOSITIVI DI CONTROLLO; Selettore dei punti
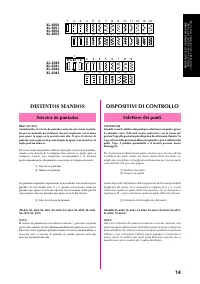
14 KNOWING YOUR SEWING MACHINE CONOZCA SU M Á QUINA DE COSER CONOSCERE LA MACCHINA DA CUCIRE DISTINTOS MANDOS Selector de puntadas PRECAUCIÓNCuando utilice el selector de puntadas, antes de seleccionar la punta-da gire la ruedecilla hacia delante (hacia la izquierda) con la manopara poner la aguja e...
Pagina 14 - LUNGHEZZE DEI PUNTI CONSIGLIATE
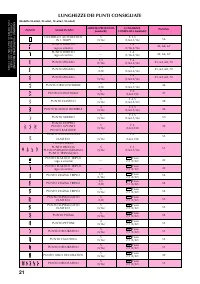
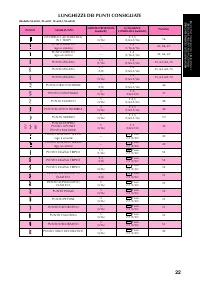
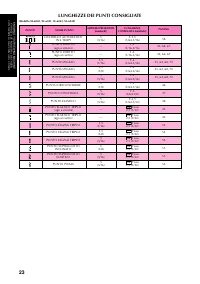
21 KNOWING YOUR SEWING MACHINE CONOZCA SU M Á QUINA DE COSER CONOSCERE LA MACCHINA DA CUCIRE LUNGHEZZE DEI PUNTI CONSIGLIATE (Modello XL-6060, XL-6061, XL-6062, XL-6063) PUNTO NOME PUNTO AMPIEZZA PREDEFINITA LUNGHEZZA PAGINA [mm(inch)] CONSIGLIATA [mm(inch)] OCCHIELLO AUTOMATICO 5 F-1,5 56 IN 1 TEMP...
Pagina 17 - Selector de largo de puntada; Selettore della lunghezza del punto
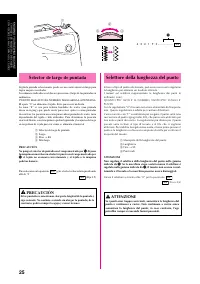
25 KNOWING YOUR SEWING MACHINE CONOZCA SU M Á QUINA DE COSER CONOSCERE LA MACCHINA DA CUCIRE Selector de largo de puntada Según la puntada seleccionada, puede ser necesario ajustar su largo paralograr mejores resultados.Los números indicados en el disco representan el largo de las puntadas enmilímet...
Pagina 18 - Reverse Sewing Lever; Tasto di cucitura di ritorno
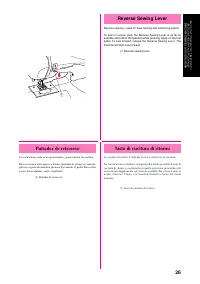
26 KNOWING YOUR SEWING MACHINE CONOZCA SU M Á QUINA DE COSER CONOSCERE LA MACCHINA DA CUCIRE 1 Reverse Sewing Lever Reverse sewing is used for back tacking and reinforcing seams. To sew in reverse, push the Reverse Sewing Lever in as far aspossible and hold in that position while pressing lightly on...
Pagina 19 - Converting to Free-arm Style; Conversión en modalidad de brazo; Cucitura a braccio libero
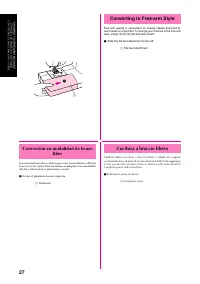
27 KNOWING YOUR SEWING MACHINE CONOZCA SU M Á QUINA DE COSER CONOSCERE LA MACCHINA DA CUCIRE 1 1 Converting to Free-arm Style Free-arm sewing is convenient for sewing tubular and hard-to-reach areas on a garment. To change your machine to the free-armstyle, simply lift out the flat bed attachment. 1...
Pagina 20 - THREADING; Winding the Bobbin; PROCEDURE DI INFILATURA; Avvolgimento del rocchetto; ENHEBRADO DE LA; Bobinado de la canilla
28 KNOWING YOUR SEWING MACHINE CONOZCA SU M Á QUINA DE COSER CONOSCERE LA MACCHINA DA CUCIRE THREADING THE MACHINE Winding the Bobbin CAUTION • If the thread spool and/or spool cap are set incorrectly,the thread may tangle on the spool pin. • Use the spool cap (large, medium, or small) that iscloses...
Pagina 22 - Infilatura inferiore; Enhebrado inferior
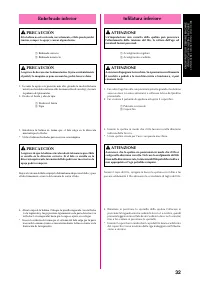
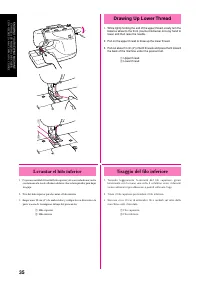
32 KNOWING YOUR SEWING MACHINE CONOZCA SU M Á QUINA DE COSER CONOSCERE LA MACCHINA DA CUCIRE Infilatura inferiore ATTENZIONE Un’impostazione non corretta della spolina può provocarel’allentamento della tensione del filo, la rottura dell’ago edeventuali lesioni personali. 1 Avvolgimento regolare 2 Av...
Pagina 23 - Infilatura superiore; Enhebrado superior
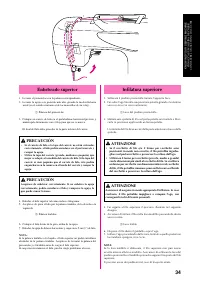
34 KNOWING YOUR SEWING MACHINE CONOZCA SU M Á QUINA DE COSER CONOSCERE LA MACCHINA DA CUCIRE Infilatura superiore 1. Sollevare il piedino premistoffa tramite l’apposita leva.2. Far salire l’ago fino alla sua posizione più alta girando il volantino verso se stessi (in senso antiorario). 1 Leva del pi...
Pagina 24 - Drawing Up Lower Thread; Tiraggio del filo inferiore
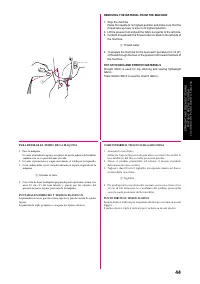
35 KNOWING YOUR SEWING MACHINE CONOZCA SU M Á QUINA DE COSER CONOSCERE LA MACCHINA DA CUCIRE Drawing Up Lower Thread 1. While lightly holding the end of the upper thread, slowly turn the balance wheel to the front (counterclockwise) once by hand tolower and then raise the needle. 2. Pull on the uppe...
Pagina 25 - Twin Needle Sewing; Cucitura con ago gemello; Costura con aguja doble
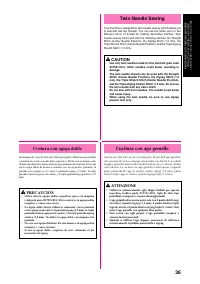
36 KNOWING YOUR SEWING MACHINE CONOZCA SU M Á QUINA DE COSER CONOSCERE LA MACCHINA DA CUCIRE Twin Needle Sewing Your machine is designed for twin needle sewing, which allows youto sew with two top threads. You can use the same color or twodifferent colors of thread for making decorative stitches. Tw...
Pagina 27 - Thread Tension; Tensione del filo; Tensión de los hilos
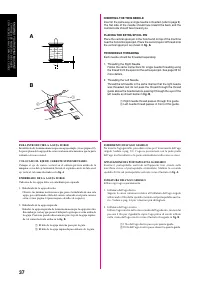
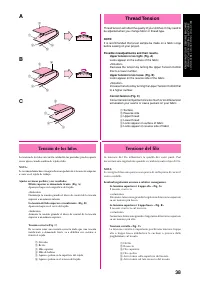
38 KNOWING YOUR SEWING MACHINE CONOZCA SU M Á QUINA DE COSER CONOSCERE LA MACCHINA DA CUCIRE Thread Tension Thread tension will affect the quality of your stitches. It may need tobe adjusted when you change fabric or thread type. NOTE: It is recommended that a test sample be made on a fabric scrapbe...
Pagina 30 - PLEASE READ BEFORE SEWING; LEGGERE PRIMA DI CUCIRE; LEA ESTO POR FAVOR ANTES DE COSER
41 STRAIGHT AND ZIGZAG STITCHING PUNTADAS RECTAS Y ZIGZAG CUCITURA CON PUNTO DIRITTO E ZIG-ZAG PLEASE READ BEFORE SEWING CAUTION • To avoid injury, pay special attention to the needle while the machine is in operation. Keep your hands away from movingparts while the machine is in operation. • Do not...
Pagina 31 - Straight Stitching; Punto diritto; Puntadas rectas
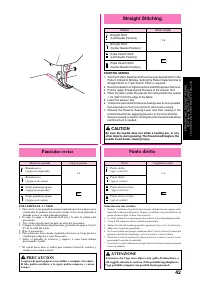
42 STRAIGHT AND ZIGZAG STITCHING PUNTADAS RECTAS Y ZIGZAG CUCITURA CON PUNTO DIRITTO E ZIG-ZAG SS SS Straight Stitching Pattern Stitch Length (Straight Stitch 1-4 (Left Needle Position)) (Straight Stitch (Center Needle Position)) (Triple Stretch Stitch (Left Needle Position)) (Triple Stretch Stitch ...
Pagina 34 - Zigzag Stitching; Punto zigzag; Puntadas zigzag
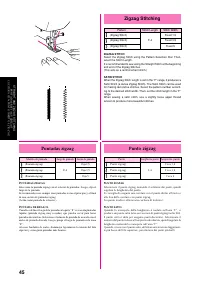
45 STRAIGHT AND ZIGZAG STITCHING PUNTADAS RECTAS Y ZIGZAG CUCITURA CON PUNTO DIRITTO E ZIG-ZAG Zigzag Stitching Pattern Stitch Length Stitch Width (Zigzag Stitch) Fixed 1.5 (Zigzag Stitch) F-4 Fixed 3.5 (Zigzag Stitch) Fixed 5 ZIGZAG STITCH Select the Zigzag Stitch using the Pattern Selection Dial. ...
Pagina 35 - Blind Hem Stitching; Puntadas invisibles
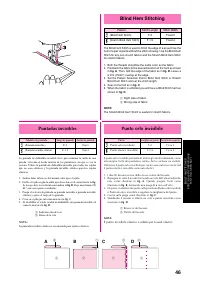
46 BUILT-IN STITCHES PUNTADAS INCORPORADAS PUNTI INCORPORATI Blind Hem Stitching Pattern Stitch Length Stitch Width (Blind Hem Stitch) F-2 Fixed 3 (Stretch Blind Hem Stitch) F-1.5 Fixed 4 The Blind Hem Stitch is used to finish the edge of a project like thehem of a pair of pants without the stitch s...
Pagina 36 - Shell Tuck Stitching; Punto conchiglia; Puntada ondas
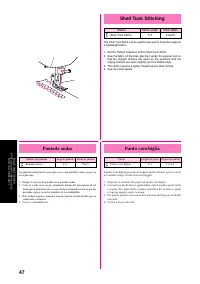
47 BUILT-IN STITCHES PUNTADAS INCORPORADAS PUNTI INCORPORATI Shell Tuck Stitching Pattern Stitch Length Stitch Width (Shell Tuck Stitch) F-3 Fixed 5 The Shell Tuck Stitch can be used to sew a picot (lace like) edge ona lightweight fabric. 1. Set the Pattern Selection Dial to Shell Tuck Stitch.2. Sew...
Pagina 37 - Elastic Stitching; Punto elastico; Puntada elástica
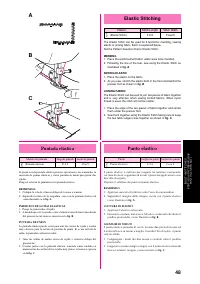
48 BUILT-IN STITCHES PUNTADAS INCORPORADAS PUNTI INCORPORATI Elastic Stitching Pattern Stitch Length Stitch Width (Elastic Stitch) F-2.5 Fixed 5 The Elastic Stitch can be used for 3 functions: mending, sewingelastic or joining fabric. Each is explained below.Set the Pattern Selection Dial to Elastic...
Pagina 38 - Double Action Stitching; Punto doppio; Puntada de acción doble
49 BUILT-IN STITCHES PUNTADAS INCORPORADAS PUNTI INCORPORATI Double Action Stitching Pattern Stitch Length Stitch Width (Double Action Stitch) (Bridging Stitch) F-3 Fixed 5 (Rampart Stitch) (Decorative hem Stitch) SS These stitches are used for joining two pieces of fabric, for example,when making p...
Pagina 39 - Scallop Stitching; Punto smerlo; Puntada festón
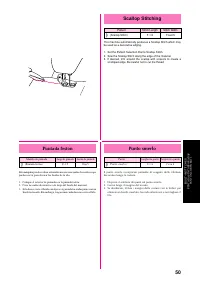
50 BUILT-IN STITCHES PUNTADAS INCORPORADAS PUNTI INCORPORATI Scallop Stitching Pattern Stitch Length Stitch Width (Scallop Stitch) F-1.5 Fixed 5 This machine automatically produces a Scallop Stitch which maybe used as a decorative edging. 1. Set the Pattern Selection Dial to Scallop Stitch.2. Sew th...
Pagina 40 - Decorative Stitching; Punto decorativo; Puntadas decorativas
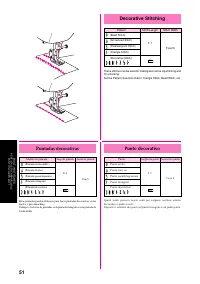
51 BUILT-IN STITCHES PUNTADAS INCORPORADAS PUNTI INCORPORATI SS SS SS Decorative Stitching Pattern Stitch Length Stitch Width (Bead Stitch) (Arrowhead Stitch) F-1 (Parallelogram Stitch) Fixed 5 (Triangle Stitch) (Decorative Stitch) These stitches can be used for making decorative top stitching andfo...
Pagina 41 - Lavori di patchwork; Patchwork
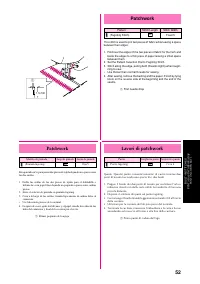
52 BUILT-IN STITCHES PUNTADAS INCORPORADAS PUNTI INCORPORATI Patchwork Pattern Stitch Length Stitch Width (Fagoting Stitch) SS Fixed 5 This stitch is used to join two pieces of fabric while leaving a spacebetween their edges. 1. Fold over the edges of the two pieces of fabric for the hem and baste t...
Pagina 42 - Overedge Stitching; Rifinitura a sopraggitto; Puntada por encima de la orilla
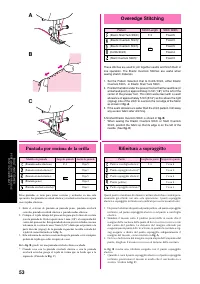
53 BUILT-IN STITCHES PUNTADAS INCORPORADAS PUNTI INCORPORATI A B C Overedge Stitching Pattern Stitch Length Stitch Width (Elastic Shell Tuck Stitch) F-3 Fixed 5 (Elastic Overlock Stitch)* Fixed 3 (Elastic Overlock Stitch) SS Fixed 5 (Comb Stitch) Fixed 4 (Slant Overlock Stitch)* Fixed 3 These stitch...
Pagina 43 - Feather Stitching
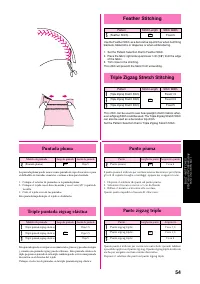
54 BUILT-IN STITCHES PUNTADAS INCORPORADAS PUNTI INCORPORATI Feather Stitching Pattern Stitch Length Stitch Width (Feather Stitch) SS Fixed 5 Use the Feather Stitch as a decorative top stitch or when hemmingblankets, tablecloths or draperies or when embroidering. 1. Set the Pattern Selection Dial to...
Pagina 44 - Esecuzione di un occhiello; Para coser ojales
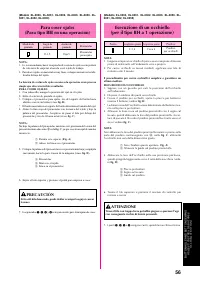
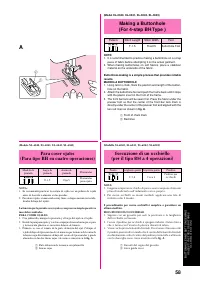
56 BUTTONHOLE AND BUTTON SEWING OJALES Y COSTURA DE BOTONES OCCHIELLI E BOTTONI (Modello XL-6060, XL-6061, XL-6062, XL-6063, XL-6050, XL-6051, XL-6052, XL-6053) Esecuzione di un occhiello (per il tipo BH a 1 operazione) Punto Lunghezza punto Ampiezza punto Piedino F-1,5 Fissa 5 Piedino per occhielli...
Pagina 45 - Botones con formas extrañas que no; Odd-shaped buttons that do not; Bottoni di forma strana che non si
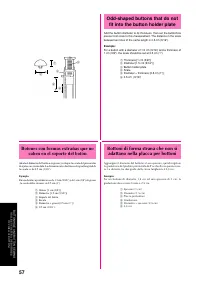
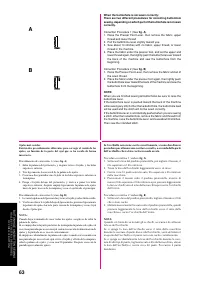
57 BUTTONHOLE AND BUTTON SEWING OJALES Y COSTURA DE BOTONES OCCHIELLI E BOTTONI Botones con formas extrañas que no caben en el soporte del botón Añada el diámetro del botón a su grosor y coloque la escala del prensatelasde ojales en esta medida. La distancia entre dos líneas de igual longitud dela e...
Pagina 49 - Regolazione della densità dei punti
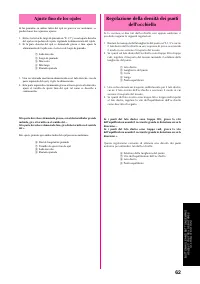
62 BUTTONHOLE AND BUTTON SEWING OJALES Y COSTURA DE BOTONES OCCHIELLI E BOTTONI Regolazione della densità dei punti dell’occhiello Se la cucitura ai due lati dell’occhiello non appare uniforme, èpossibile eseguire le seguenti regolazioni. 1. Ruotare la manopola della lunghezza del punto su "F-1,...
Pagina 51 - Button Sewing; Costura de botones; Cucitura di bottoni
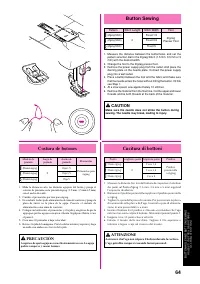
64 BUTTONHOLE AND BUTTON SEWING OJALES Y COSTURA DE BOTONES OCCHIELLI E BOTTONI Button Sewing Pattern Stitch Length Stitch Width Foot (Zigzag Stitch) Fixed 1.5 (Zigzag Stitch) 0 Fixed 3.5 (Zigzag Stitch) Fixed 5 1. Measure the distance between the buttonholes and set the pattern selection dial to th...
Pagina 52 - Applicazione di cerniere; Arricciature; Fruncido
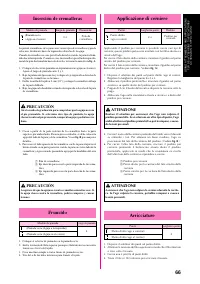
66 USING ATTACHMENTS AND APPLICATIONS USO DE ACCESORIOS Y APLICACIONES GUARNIZIONI E APPLICAZIONI Applicazione di cerniere Punto Lunghezza punto Piedino (Punto diritto 2-3 (ago a centro)) Applicando il piedino per cerniere è possibile cucire vari tipi dicerniere; questo piedino può essere montato co...
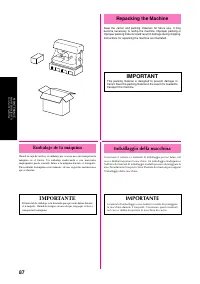
Pagina 53 - Darning
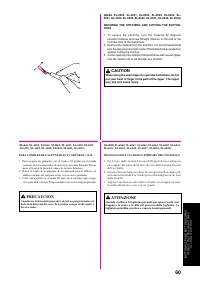
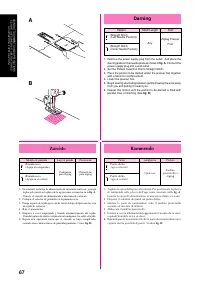
67 USING ATTACHMENTS AND APPLICATIONS USO DE ACCESORIOS Y APLICACIONES GUARNIZIONI E APPLICAZIONI Piedino premistoffa a zigzag Darning Pattern Stitch Length Foot (Straight Stitch Any (Left Needle Position)) (Straight Stitch (Center Needle Position)) 1. Remove the power supply plug from the outlet. A...
Pagina 54 - Appliqués; Applicazioni; Aplicaciones
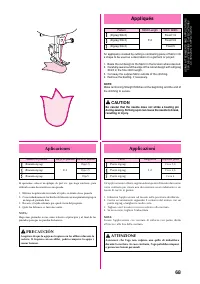
68 USING ATTACHMENTS AND APPLICATIONS USO DE ACCESORIOS Y APLICACIONES GUARNIZIONI E APPLICAZIONI Appliqués Pattern Stitch Length Stitch Width (Zigzag Stitch) Fixed 1.5 (Zigzag Stitch) F-2 Fixed 3.5 (Zigzag Stitch) Fixed 5 An appliqué is created by cutting a contrasting piece of fabric intoa shape t...
Pagina 55 - Monogrammi e ricami; Monogramas y bordados
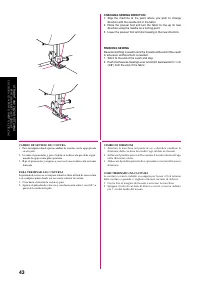
70 USING ATTACHMENTS AND APPLICATIONS USO DE ACCESORIOS Y APLICACIONES GUARNIZIONI E APPLICAZIONI Monogrammi e ricami Punto Lunghezza punto Ampiezza punto Piedino (Punto zigzag) Fissa 1,5 (Punto zigzag) Qualsiasi Fissa 3,5 Nessuno (Punto zigzag) Fissa 5 PREPARAZIONE PER LA CUCITURA DI MONOGRAMMI E R...
Pagina 56 - Utilizzazione del piedino semovente; Utilización del pie caminante
72 USING ATTACHMENTS AND APPLICATIONS USO DE ACCESORIOS Y APLICACIONES GUARNIZIONI E APPLICAZIONI ACCESSORI OPZIONALI Utilizzazione del piedino semovente Punto Lunghezza Ampiezza punto (Punto diritto 0 (ago al centro) (Punto zigazg) 1-4 Fissa 1,5 (Punto zigazg) Fissa 3,5 (Punto zigazg) Fissa 5 Quest...
Pagina 57 - Utilizzazione del piedino per; Utilización del prensatelas
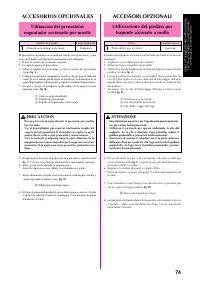
74 USING ATTACHMENTS AND APPLICATIONS USO DE ACCESORIOS Y APLICACIONES GUARNIZIONI E APPLICAZIONI ACCESSORI OPZIONALI Utilizzazione del piedino per trapunte azionato a molla Punto Lunghezza punto (Punto diritto (ago al centro)) Qualsiasi Il piedino per trapunte azionato a molla è utile per foderare ...
Pagina 58 - Utilización del prensatela para
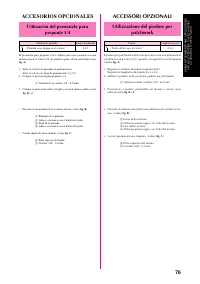
76 USING ATTACHMENTS AND APPLICATIONS USO DE ACCESORIOS Y APLICACIONES GUARNIZIONI E APPLICAZIONI ACCESSORI OPZIONALI Utilizzazione del piedino per patchwork Punto Lunghezza punto (Punto diritto (ago al centro)) 2-2,5 Il piedino per patchwork è utilizzato per cucire con una tolleranza dicucitura fis...
Pagina 59 - Sostituzione della lampadina; Cambio de la bombilla
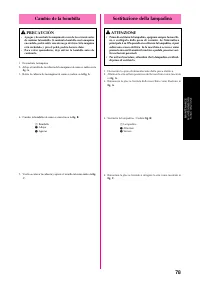
78 MAINTENANCE MANTENIMIENTO MANUTENZIONE Sostituzione della lampadina ATTENZIONE • Prima di sostituire la lampadina, spegnere sempre la macchi- na e scollegarla dalla presa di corrente. Se l’interruttoreprincipale è su ON quando si sostituisce la lampadina, si puòsubire una scossa elettrica. Se la ...
Pagina 60 - Pulizia; Limpieza
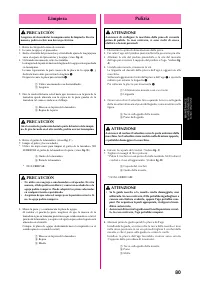
80 MAINTENANCE MANTENIMIENTO MANUTENZIONE Pulizia ATTENZIONE Assicurarsi di scollegare la macchina dalla presa di correnteprima di pulirla. In caso contrario, vi sono rischi di scossaelettrica o lesioni personali. 1. Disinserire la spina di alimentazione dalla presa.2. Far salire l’ago ed il piedino...
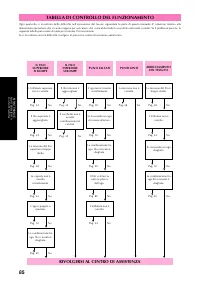
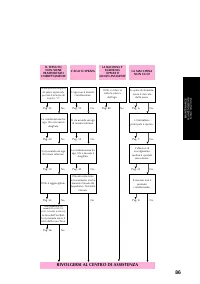
Pagina 61 - TABELLA DI CONTROLLO DEL FUNZIONAMENTO; RIVOLGERSI AL CENTRO DI ASSISTENZA
85 MAINTENANCE MANTENIMIENTO MANUTENZIONE TABELLA DI CONTROLLO DEL FUNZIONAMENTO No Pag. 40 No Pag. 80 No Pag. 10 No Pag. 32 Il rocchetto non è avvolto correttamente nel crochet. Si sta usando un ago di misura inferiore. Il filo si sfilaccia sotto la placca dell’ago. La combinazione fra ago,filo e t...


 Brother 750E
Manuale
Brother 750E
Manuale
 Brother BM-3600 2700
Manuale d'uso
Brother BM-3600 2700
Manuale d'uso
 Brother CS-100T 4000 5000H
Manuale d'uso
Brother CS-100T 4000 5000H
Manuale d'uso
 Brother DCP 7010
Manuale d'uso
Brother DCP 7010
Manuale d'uso
 Brother Embroidering Machine
Manuale d'uso
Brother Embroidering Machine
Manuale d'uso
 Brother FAX-570e
Manuale d'uso
Brother FAX-570e
Manuale d'uso
 Brother HE-240
Manuale
Brother HE-240
Manuale
 Brother HL-5040
Manuale d'uso
Brother HL-5040
Manuale d'uso
 Brother HL-8050N
Manuale d'uso
Brother HL-8050N
Manuale d'uso
 Brother JS23
Manuale d'uso
Brother JS23
Manuale d'uso
 Brother MFC-3240C
Manuale d'uso
Brother MFC-3240C
Manuale d'uso
 Brother NC-7100W
Manuale d'uso
Brother NC-7100W
Manuale d'uso
 Brother PED-BASIC
Manuale
Brother PED-BASIC
Manuale
 Brother PJ-522
Manuale d'uso
Brother PJ-522
Manuale d'uso
 Brother PR-600C
Manuale d'uso
Brother PR-600C
Manuale d'uso
 Brother PT-220
Manuale d'uso
Brother PT-220
Manuale d'uso
 Brother PT-2470
Manuale d'uso
Brother PT-2470
Manuale d'uso
 Brother SE-270D
Manuale
Brother SE-270D
Manuale