ëàçàâ - Candy CWB 1382 DN1-07S - Manuale d'uso - Pagina 11


Indice:
- Pagina 3 – INDICE; KAPITEL; INHALT; CHAPITRE; OÃËABËEHÈE; ÏAPAÃPAÔ
- Pagina 6 – VORSCHRIFTEN; CHAPITRE 3; MESURES DE; ÏÀPÀÃPÀÔ 3; ÌÅPÛ; áÌ‡Í Û͇Á ̊‚‡ÂÚ, ̃ÚÓ ÔË·Ó; CHAPTER 3; SAFETY MEASURES; FOR ALL CLEANING
- Pagina 8 – MPa; DONNÉES TECHNIQUES; CAPITOLO 4; TECHNICAL DATA; CHAPTER 4; Texíè÷ecêèe xapaêòepècòèêè; ÏÀPÀÃPÀÔ 4; ä·ÒÒ Á‡ ̆ËÚ ̊ ÓÚ ÔÓ‡ÊÂÌËfl
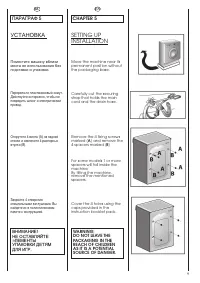
- Pagina 9 – CHAPITRE 5; MISE EN PLACE; CAPITOLO 5; NON LASCI ALLA; CHAPTER 5; SETTING UP; ÍÅ ÎÑÒÀÂËßÉÒÅ; ÏÀPÀÃPÀÔ 5; ÓÑÒÀÍÎÂÊÀ; Ïîìåñòèòå ìàøèíó âáëèçè
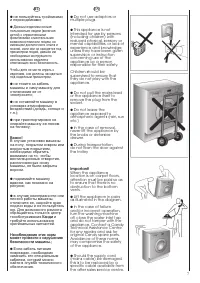
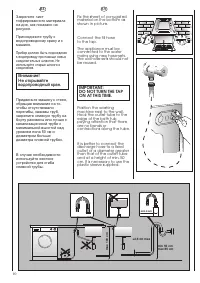
- Pagina 10 – WASSERHAHN NOCH NICHT; NE PAS OUVRIR LE; èË·Ó ‰ÓÎÊÂÌ · ̊Ú ̧ ÔÓ‰ÒÓ‰ËÌÂÌ; Íå îòêpûâàéòå
- Pagina 11 – ëàçàâ
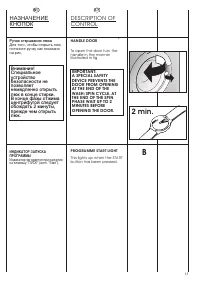
- Pagina 13 – ÍÀÇÍÀ; àçÑàäÄíéê áÄèìëäÄ; à̉Ë͇ÚÓ Á‡„Ó‡ÂÚÒfl ÔË Ì‡Ê‡ÚËË; Pó÷êà oòêpûâaíèÿ ë; Äëÿ òoro, ÷òoáû oòêpûòü ë
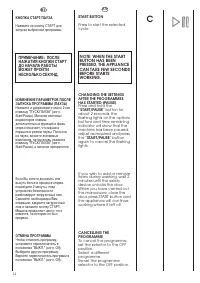
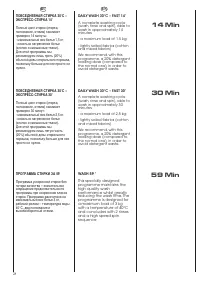
- Pagina 14 – çÄÜÄíàü äçéèäà ëíÄêí; àáåÖçÖçàÖ èÄêÄåÖíêéÇ èéëãÖ
- Pagina 20 – per iniziare il ciclo di lavaggio; ëÇÖíéÇõÖ àçÑàäÄíéêõ
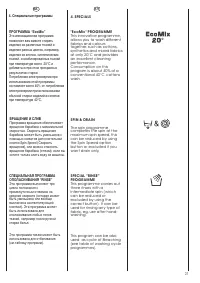
- Pagina 25 – ëÔˆˇΠ̧Ì ̊ ÔÓ„‡ÏÏ ̊
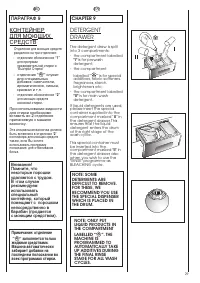
- Pagina 27 – CHAPITRE 9; TIROIR A LESSIVE; CAPITOLO 9; CASSETTO DETERSIVO; CHAPTER 9; ÏÀPÀÃPÀÔ 9; ÊÎÍÒÅÉÍÅP; èËÏ ̃‡ÌËÂ: ÓÚ‰ÂÎÂÌËÂ
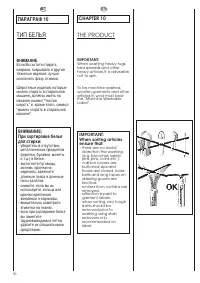
- Pagina 28 – IL PRODOTTO; - nella biancheria da; DAS PRODUKT; Au cours de la phase; iè; THE PRODUCT; When sorting articles; íàè ÅÖãúü; èË ÒÓÚËÓ‚Í ·ÂÎ ̧fl
- Pagina 29 – UTILISATEUR
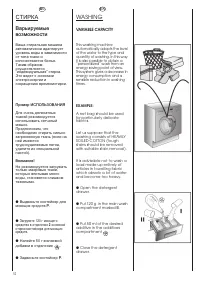
- Pagina 30 – LAVAGE; CAPACITÉ VARIABLE; LAVAGGIO; CAPACITÁ VARIABILE; WASHING; VARIABLE CAPACITY; Ïpèìåp ÈÑÏÎËÜÇÎÂÀÍÈß; ᇄÛÁËÚ 120 „ ÏÓ ̨ ̆„Ó; ÑÒÈPÊÀ
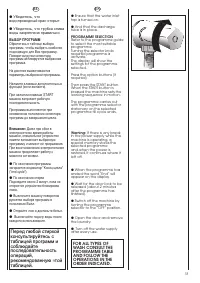
- Pagina 31 – âîäîïpîâîäíûé êpàí îòêpûò.
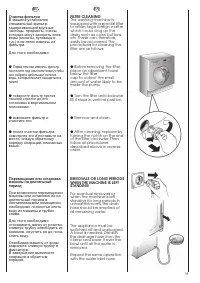
- Pagina 32 – CLEANING AND; CLEANING OF DRAWER; ÈÑÒÊÀ; Î÷èñòêà êîíòåéíåpà ìî
IT
Livelli la macchina con i 4
piedini:
a)
Girare in senso orario il
dado per sbloccare la vite
del piedino.
b)
Ruotare il piedino e farlo
scendere o salire fino ad
ottenere la perfetta
aderenza al suolo.
c)
Bloccare infine il piedino
riavvitando il dado in senso
antiorario, fino a farlo aderire
al fondo della lavatrice.
Si assicuri che la manopola
sia in posizione “OFF” e l’oblò
sia chiuso.
Inserisca la spina.
ATTENZIONE:
nel caso s
i
renda necessar
i
o
sost
i
tu
i
re
i
l cavo d
i
al
i
mentaz
i
one, ass
i
curars
i
d
i
r
i
spettare
i
l seguente
cod
i
ce-colore durante
i
l
collegamento de
i
s
i
ngol
i
f
i
l
i:
BLU
- NEUTRO (N)
MARRONE
- FASE (L)
GIALLO-VERDE - TERRA ( )
L’apparecchio deve essere
posto in modo che la spina
sia accessibile ad
installazione avvenuta.
A
B
C
DE
R
i
chten S
i
e das Gerät m
i
t
den 4 Verstellfüßen
waagerecht aus
:
a)
Kontermuttern
i
m
Uhrze
i
gers
i
nn lösen
.
b)
Standfuß e
i
nregul
i
eren, b
i
s
das Gerät genau
ausger
i
chtet
i
st (mögl
i
chst
m
i
t der Wasserwaage
j
ust
i
eren!)
.
c)
Kontermuttern (gegen
den Uhrze
i
gers
i
nn) festz
i
ehen
.
W
i
cht
i
g
:
Sollte das Gerät auf
e
i
nen Sockel aufgestellt
werden,
i
st es durch e
i
ne
Sockelbefest
i
gung zu s
i
chern
.
Erkund
i
gen S
i
e s
i
ch b
i
tte
h
i
erfür
i
m Fachhandel
.
Der Hersteller haftet n
i
cht für
unsachgemäße Aufstellung
und Installat
i
on
.
S
i
cherstellen, daß der
Schalter auf “OFF” steht, und
das Bullauge geschlossen
i
st
.
Stecker e
i
nstecken
.
ACHTUNG:
Falls das Netzkabel
ausgetauscht werden sollte,
achten S
i
e be
i
m Anschluss
der e
i
nzelnen Kabel
unbed
i
ngt auf d
i
e folgende
Farbenbelegung
:
BLAU
- NULLLEITER (N)
BRAUN
- PHASE (L)
GELB-GRÜN - ERDE ( )
Nach der Installat
i
on muß der
Anschluß zugängl
i
ch se
i
n
.
V
é
r
i
f
i
er que la manette so
i
t
sur la pos
i
t
i
on “OFF” et que le
hublot so
i
t ferm
é.
Brancher la pr
i
se
.
ATTENTION:
Au cas où
i
l sera
i
t n
é
cessa
i
re
de remplacer le cable
d
’
al
i
mentat
i
on, assurez vous
de respecter les codes-
couleur su
i
vants dans le
branchement de chacun
des f
i
ls
:
BLEU
- NEUTRE (N)
MARRON
- PHASE (L)
VERT-JAUNE
- TERRE ( )
Une fo
i
s l
'
appare
i
l
i
nstall
é
, la
pr
i
se
é
lectr
i
que do
i
t rester
access
i
ble
.
FR
Mettre la mach
i
ne
à
n
i
veau
en reglant les 4 p
i
eds
:
a)
Tourner dans le sens des
a
i
gu
i
lles d
’
une montre
l
’é
crou de façon
à
d
é
v
é
rou
i
ller la v
i
s du p
i
ed
.
b)
Tourner le p
i
ed et le fa
i
re
monter ou descendre
j
usqu
’à
obten
i
r une parfa
i
te
adh
é
rence au sol
.
c)
Enf
i
n bloquer le p
i
ed en
rev
i
ssant l
’é
crou dans le sens
i
nverse des a
i
gu
i
lles d
’
une
montre et le fa
i
re adh
é
rer au
fond de la mach
i
ne
.
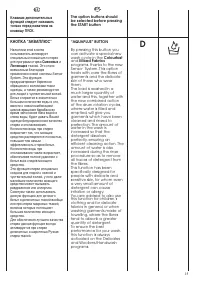
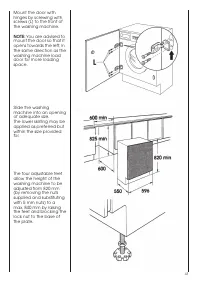
EN
Use the 4 feet to level the
mach
i
ne w
i
th the floor
:
a)
Turn the nut clockw
i
se to
release the screw ad
j
uster of
the foot
.
b)
Rotate foot to ra
i
se or
lower
i
t unt
i
l
i
t stands f
i
rmly on
the ground
.
c)
Lock the foot
i
n pos
i
t
i
on
by turn
i
ng the nut ant
i
-
clockw
i
se unt
i
l
i
t comes up
aga
i
nst the bottom of the
mach
i
ne
.
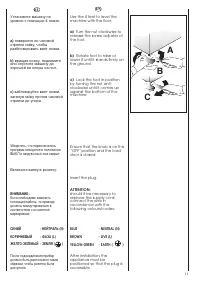
Ensure that the knob
i
s on the
“OFF” pos
i
t
i
on and the load
door
i
s closed
Insert the plug
.
ATTENTION:
should
i
t be necessary to
replace the supply cord,
connect the w
i
re
i
n
accordance w
i
th the
follow
i
ng colours/codes
:
BLUE
- NEUTRAL (N)
BROWN
- LIVE (L)
YELLOW-GREEN
- EARTH ( )
After
i
nstallat
i
on, the
appl
i
ance must be
pos
i
t
i
oned so that the plug
i
s
access
i
ble
.
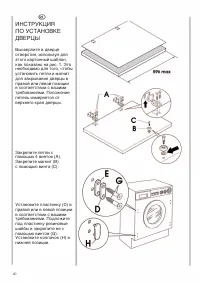
RU
Óñòàíîâèòå ìàøèíó ïî
ópîâí
ю
ñ ïîìîùü
ю
4 íîæåê.
a)
ïîâåpíèòå ïî ÷àñîâîé
ñòpåëêå ãàéêó, ÷òîáû
pàçáëîêèpîâàòü âèíò íîæêè.
b)
âpàùàÿ íîæêó, ïîäíèìèòå
èëè îïóñòèòå ìàøèíó äî
õîpîøåé åå îïîpû íà ïîë.
c)
çàáëîêèpóéòå âèíò íîæêè,
çàòÿíóâ ãàéêó ïpîòèâ ÷àñîâîé
ñòpåëêè äî óïîpà.
ì·Â‰ËÚÂÒ¸, ˜ÚÓ ÔÂÂÍβ˜‡ÚÂθ
ÔÓ„‡ÏÏ Ì‡ıÓ‰ËÚÒfl ‚ ÔÓÎÓÊÂÌËË
Çõäã Ë Á‡„ÛÁÓ˜Ì˚È Î˛Í Á‡Í˚Ú.
Âêë
ю
÷èòå âèëêó â pîçåòêó.
ÇçàåÄçàÖ:
ÖÒÎË ÌÂÓ·ıÓ‰ËÏÓ Á‡ÏÂÌËÚ¸
ÔËÚ‡˛˘ËÈ Í‡·Âθ, ÚÓ ÔÓ‚Ó‰‡
‰ÓÎÊÌ˚ ÍÓÏÏÛÚËÓ‚‡Ú¸Òfl ‚
ÒÓÓÚ‚ÂÚÒÚ‚ËË Ò Ëı ˆ‚ÂÚÌÓÈ
χÍËÓ‚ÍÓÈ:
ëàçàâ
- çÖâíêÄãú (N)
äéêàóçÖÇõâ
- îÄáÄ (L)
ÜÖãíé-áÖãÖçõâ - áÖåãü ( )
èÓÒΠÔÓ‰ÒÓ‰ËÌÂÌËfl ÔË·Ó
‰ÓÎÊÂÌ ·˚Ú¸ ‡ÒÔÓÎÓÊÂÌ Ú‡ÍËÏ
Ó·‡ÁÓÏ, ˜ÚÓ·˚ ÓÁÂÚ͇ ·˚·
‰ÓÒÚÛÔÌÓÈ.
11
"Caricamento dell'istruzione" significa che è necessario attendere finché il file non è caricato e pronto per la lettura online. Alcune istruzioni sono molto grandi e il tempo di caricamento dipende dalla velocità della tua connessione a Internet.
Sommario
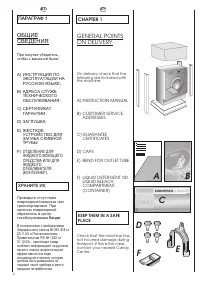
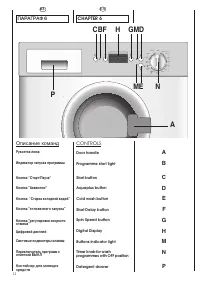
IT INDICE Prefazione Note generali alla consegna Garanzia Prescrizioni di sicurezza Dati tecnici Messa in opera, installazione Descrizione comandi Tabella programmi Selezione Cassetto detersivo Il prodotto Lavaggio Pulizia e manutenzioneordinaria Ricerca guasti KAPITEL CAPITOLO CAPÍTULO CAPÍTULO CHA...
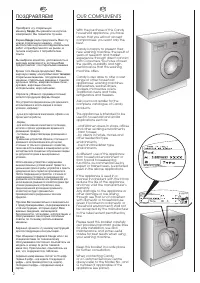
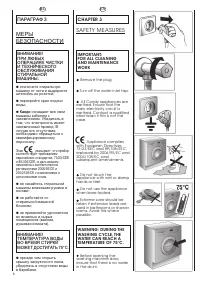
IT CAPITOLO 3 PRESCRIZIONI DISICUREZZA ATTENZIONE:PER QUALSIASIINTERVENTO DI PULIZIAE MANUTENZIONEDELLA LAVATRICE ● Tolga la spina. ● Chiuda il rubinetto dell’acqua. ● La Candy correda tutte le sue macchine di messa a terra. Si assicuri che l’impianto elettrico sia provvisto di messa a terra in caso...
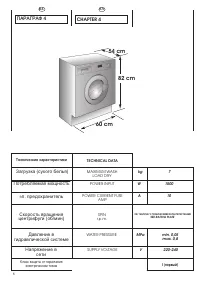
g k 1500 10 min. 0,05 max. 0,8 220-240 W A VEDERE TARGHETTA DATI VERIFIQUE A PLACA DE IDENTIFIÇÃO VER TARJETA DE DATOS MPa V 6 CAPACITA’ DI BIANCHERIA ASCIUTTA POTENZA ASSORBITA AMPERE DEL FUSIBILE DELLA RETE GIRI DI CENTRIFUGA (giri/min.) PRESSIONE NELL’IMPIANTO IDRAULICO TENSIONE DATI TECNICI CONS...
Altri modelli di lavatrici Candy
-
 Candy CBW27D1E-S
-
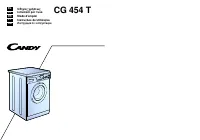 Candy CG 454 T
-
 Candy CG 544 T
-
 Candy CS1282DE-S
-
 Candy CS41172DE/2-S
-
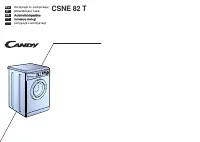 Candy CSNE 82 T
-
 Candy CST26LE/1-S
-
 Candy CWB 1308
-
 Candy CWB 1372 DN1-07
-
 Candy GO 108