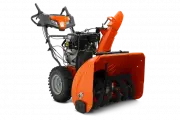
Husqvarna ST 230P - Manuale d'uso - Pagina 33


Indice:
- Pagina 3 – PROCEDURE DI SICUREZZA PER L’UTILIZZO DI SPAZZANEVE; Addestramento
- Pagina 9 – Como preparar su máquina quitanieves; Abrir la empuñadura superior; Hoe uw sneeuwruimer te monteren; Het uitpakken van de bovenste hendel; Come preparare lo spazzaneve; Impugnatura superiore aperta
- Pagina 11 – Het installeren van de afvoertrechter / rotorkop; Montaggio della bocca di scarico/ testa dispositivo
- Pagina 13 – Montar el mando a distancia del de flec tor del conducto; Het installeren van de afstandsbesturing van de de-; Montaggio del telcomando del deflettore del canale
- Pagina 18 – Pour utiliser la commande d’étrangleur (E)
- Pagina 21 – Het bedienen van de sneeuwuitstoot; Regolare la bocca di scarico della neve
- Pagina 24 – Usar la herramienta para la limpieza; De ontstopper gebruiken; Utilizzo dello strumento di pulitura
- Pagina 26 – Moverse adelante y atrás; Voorwaarts en achterwaarts bewegen; Per spostarsi in avanti o all’indietro
- Pagina 29 – Per regoalre la piastra di slittamento (N)
- Pagina 32 – ANTES DE PONER EN MARCHA EL MOTOR; Controlar el nivel de aceite del motor (Q); VOORDAT U DE MOTOR START
- Pagina 47 – Máquina quitanieves; Sneeuwruimer; Spazzaneve
- Pagina 50 – Schuifbouten; Boorschuifbouten; Rotorschuifbouten; Perni di sicurezza; Perni di sicurezza della coclea; Perni di sicurezza del ventilatore espulsore
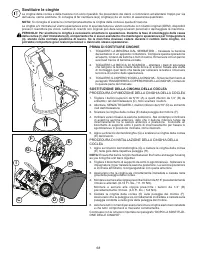
- Pagina 52 – Sostituire le cinghie; PRIMA DI SOSTITUIRE CINGHIE; PROCEDURA DI RIMOZIONE DELLA CINGHIA DELLA COCLEA
- Pagina 53 – SOSTITUZIONE DELLA CINGHIA DI TRASMISSIONE; PROCEDURA DI RIMOZIONE DELLA CINGHIA DI; DOPO LA SOSTITUZIONE DELLE CINGHIE
38
To start engine
Your snow thrower engine is equipped with both a 230
Volt A.C. electric starter and a recoil starter. The electric
starter is equipped with a three-wire power plug and is
designed to operate on 230 Volt A.C. household current.
• Be sure your house is a 230 Volt A.C. three-wire
ground ed system. If you are uncertain, consult a
licensed elec tri cian.
NOTE:
Use an extension cord recommended for outdoor
use that is not longer than 50 feet (15 m).
WARNING: Do not use the electric starter if your
house is not a 230 Volt A.C. three-wire grounded
system. Serious personal injury or damage to
your snow thrower could result.
COLD START - ELECTRIC STARTER
1. Insert safety ignition key (D) (tied to recoil start cord)
into the ignition slot until it clicks. DO NOT turn the
key. Keep the extra safety ignition key in a safe place.
2. Place throttle control (C) in “FAST” position.
3. Move ON / OFF switch (CC) to “ON” position.
4. Rotate choke control (E) to “FULL” position.
5. Push the primer (T) three (3) times.
NOTE
: Over priming may cause flooding, preventing the
engine from starting. If you do flood the engine, wait a
few minutes before attempting to start and DO NOT push
the primer.
6. Connect the extension cord to the engine (S).
7. Plug the other end of the extension cord into a three-
hole grounded 230 Volt A.C. receptacle.
8. Push starter button (U) until engine starts.
IMPORTANT
: Do not crank engine more than five continu-
ous seconds between each time you try to start. Wait 5 to
10 seconds between each attempt.
9. When the engine starts, release the starter button and
slowly move the choke control to the “OFF” position.
10. Disconnect the extension cord from the receptacle
first, then from the engine.
Allow the engine to warm up for a few minutes. Engine
will not develop full power until it has reached normal
operating temperature.
WARM START - ELECTRIC STARTER
Follow the steps above, keeping the choke control (E) in
the “OFF” position.
COLD START - RECOIL STARTER
1. Insert safety ignition key (D) (tied to recoil start cord)
into the ignition slot until it clicks. DO NOT turn the
key. Keep the extra safety ignition key in a safe place.
2. Place throttle control (C) in “FAST” position.
3. Move ON / OFF switch (CC) to “ON” position.
4. Rotate choke control (E) to “FULL” position.
5. Push the primer (T) three (3) times.
NOTE
: Over priming may cause flooding, preventing the
engine from starting. If you do flood the engine, wait a
few minutes before attempting to start and DO NOT push
the primer.
6. Pull recoil starter (V) handle quickly. Do not allow
starter rope to snap back.
7. When the engine starts, release the recoil starter
handle and slowly move the choke control to the “OFF”
position.
Allow the engine to warm up for a few minutes. Engine
will not develop full power until it has reached normal
operating temperature.
WARM START - RECOIL STARTER
Follow the steps above, keeping the choke (E) in the “OFF”
position. DO NOT push the primer (T).
Before stopping
Run the engine for a few minutes to help dry off any moisture
on the engine.
If recoil starter has frozen
If the recoil starter has frozen and will not turn the engine,
proceed as follows:
1. Grasp the recoil starter handle and slowly pull as much
rope out of the starter as possible.
2. Release the recoil starter handle and let it snap back
against the starter.
If the engine still fails to start, repeat the above steps or use
the electric starter.
Motor anlassen
Der Motor Ihrer Schneefräse ist sowohl mit einem 230 Volt
(Wechselstrom) Elektrostarter als auch einem Seilzuganlasser
ausgestattet. Der Elektrostarter ist mit einem Dreidraht-Strom-
stecker ausgestattet und für die Verwendung mit normalem
230 Volt Haushaltsstrom (Wechselstrom) vorgesehen.
•
Stellen Sie sicher, dass Ihr Haus ein geerdetes 230 Volt
A.C. Sicherheitssystem besitzt. Falls Sie sich dessen
nicht sicher sind, befragen Sie einen Elektriker.
HINWEIS:
Verwenden Sie ein für den Einsatz im Freien
zugelassenes Verlängerungskabel mit Höchstlänge von 15
Metern.
WARNUNG: Verwenden Sie den Elektrostarter
nicht, falls Ihr Haus kein geerdetes 230 Volt A.C.
Sicherheitssystem besitzt. Dies könnte ernsthafte
Verletzungen oder Schäden an Ihrer Schneefräse
zur Folge haben.
KALTSTART - ELEKTROSTARTER
1. Stecken Sie den Sicherheitszündschlüssel (D) (Mit dem
Startseilzug verbunden) in das Zündschloss, bis es
klickt. Schlüssel NICHT umdrehen. Bewahren Sie den
Ersatzsicherheitszündschlüssel an einem sicheren Ort auf.
2. Stellen Sie den Gashebel (C) auf Position “FAST”.
3. Bringen Sie den AN / AUS-Schalter (CC) auf Position
“ON” (AN).
4. Drehen Sie den Choke-Bedienungsknopf (E) auf Po si tion
“FULL”.
5. Drücken Sie dreimal (3-mal) den Primer (T).
HINWEIS:
Durch übermäßiges Einspritzen kann der Motor
geflutet werden, woraufhin er nicht anspringt. Sollten Sie den
Motor geflutet haben, warten Sie einige Minuten, bevor Sie
ihn erneut zu starten versuchen, und betätigen Sie NICHT
die Einspritzvorrichtung.
6. Schließen Sie das Verlängerungskabel am Motor (S) an.
7. Stecken Sie den Stecker der Verlängerungskabels an
eine Netzversorgung mit 230 Volt Wechselstrom an.
8. Drücken Sie den Startknopf (U), bis der Motor anspringt.
WICHTIG:
Kurbeln Sie den Motor nie länger als fünf Sekunden
lang zwischen jedem Startversuch an. Warten Sie zwischen
den Startversuchen 5 bis 10 Sekunden.
9. Sobald der Motor anspringt, lassen Sie den Startknopf los
und bewegen Sie den Choke-Bedienungsknopf langsam
in Richtung der “OFF” Position.
10. Trennen Sie das Verlängerungskabel erst von der Steck-
dose, dann vom Motor.
Lassen Sie den Motor ein paar Minuten lang warmlaufen.
Der Motor wird seine volle Leistung erst bei normaler Betrieb-
stemperatur erreichen.
WARMSTART - ELEKTROSTARTER
Folgen Sie den obigen Anweisungen und lassen Sie dabei
den Choke-Bedienungsknopf auf Position “OFF”.
KALTSTART - ANREISSSTARTER
1. Stecken Sie den Sicherheitszündschlüssel (D) (Mit dem
Startseilzug verbunden) in das Zündschloss, bis es
klickt. Schlüssel NICHT umdrehen. Bewahren Sie den
Ersatzsicherheitszündschlüssel an einem sicheren Ort auf.
"Caricamento dell'istruzione" significa che è necessario attendere finché il file non è caricato e pronto per la lettura online. Alcune istruzioni sono molto grandi e il tempo di caricamento dipende dalla velocità della tua connessione a Internet.
Sommario
8 PROCEDURE DI SICUREZZA PER L’UTILIZZO DI SPAZZANEVE Addestramento 1. Lettura attenta del manuale di istruzioni. Esercitazioni all’utilizzo corretto dei comandi e della strumentazione. Essere in grado di riconoscere quando è il momento di fermare l’unità e disinnestare velocemente i comandi. 2. Non...
14 A Como preparar su máquina quitanieves Guarde los pernos de seguridad adicionales, las tuercas y la llave múltiple suministrados en la bolsa de piezas. NOTA: La llave de apriete múltiple se puede usar para montar la cabeza rotante del conducto a la máquina quitanieves y para hacer regulaciones de...
16 Montar el conducto de eyección / cabeza rotante del conducto 1. Colocar el grupo del conducto de eyección sobre la base del conducto con la abertura de eyección hacia el frente de la máquina quitanieves. 2. Posicionar la cabeza rotante del conducto (A) sobre el soporte del con- ducto (B). Si fuer...