iv - Daikin FTXK25AV1BS - Manuale d'uso - Pagina 6


Indice:
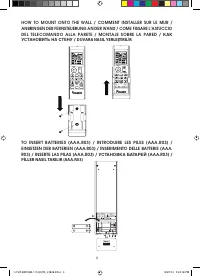
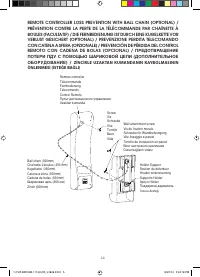
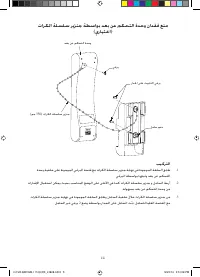
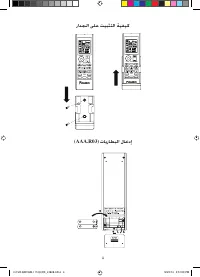
Installation
Match the ring at the end of the ball
chain with the screw hole on the back
of the remote controller and secure it
with the screw.
Attach the holder and the ball chain
as above at the position where signals
from the remote controller can be
received easily.
Pass the ball chain through the back
of the holder and match the ring at
the end of the ball chain to the upper
hole of the holder. Fix the holder to
the wall by putting through 2 screws
across it.
Installation
Faites correspondre l’anneau de
l’extrémité de la chaînette à boules
avec le trou de vis situé au dos de
la télécommande et fixez-le à l’aide
de la vis.
Fixez le support et la chaînette à boules
comme ci-dessus, dans une position
permettant une réception facile des
signaux de la télécommande.
Passez la chaînette à boules à l’arrière
du support et faites correspondre
l’anneau de l’extrémité de la chaînette
à boules avec le trou supérieur du
support. Fixez le support au mur à
l’aide de 2 vis.
1.
2.
3.
1.
2.
3.
Installation
Legen Sie den Ring am Ende der
Kugelkette auf die Schraubbohrung
an der Rückseite der Fernbedienung
und befestigen Sie ihn mit der
Schraube.
Montieren Sie die Halterung und
die Kugelkette wie oben gezeigt
an der Stelle, an der Signale von
der Fernbedienung gut empfangen
werden können.
Führen Sie die Kugelkette durch die
Rückseite der Halterung und legen
Sie den Ring am Kettenende auf
das obere Loch in der Halterung.
Befestigen Sie die Halterung mit 2
Schrauben an der Wand.
Installazione
Far combaciare l’anello all’estremità
della catena a sfera con il foro della
vite sul retro del telecomando e fissare
bene con la vite.
Fissare il supporto e la catena a sfera
al di sopra del punto in cui possono
essere ricevuti facilmente i segnali dal
telecomando.
Far passare la catena a sfera attraverso
il retro del supporto e far combaciare
l’anello all’estremità della catena con
il foro superiore del supporto. Fissare
il supporto alla parete mettendo 2 viti
attraverso di esso.
1.
2.
3.
1.
2.
3.
iv
1-CVR-BRC52B-1114(0)DK_41828-EN.6 6
1-CVR-BRC52B-1114(0)DK_41828-EN.6 6
12/23/14 3:24:18 PM
12/23/14 3:24:18 PM
"Caricamento dell'istruzione" significa che è necessario attendere finché il file non è caricato e pronto per la lettura online. Alcune istruzioni sono molto grandi e il tempo di caricamento dipende dalla velocità della tua connessione a Internet.
Sommario
Installation Match the ring at the end of the ball chain with the screw hole on the back of the remote controller and secure it with the screw.Attach the holder and the ball chain as above at the position where signals from the remote controller can be received easily.Pass the ball chain through the...
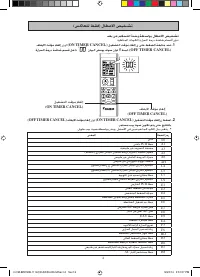
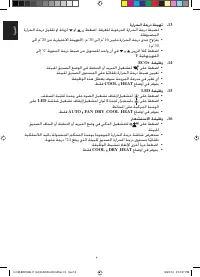
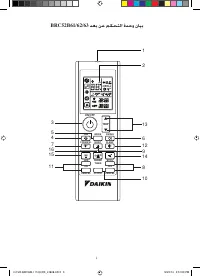
16 GUIDA ALL’USO 1. Fonte di trasmissione La fonte dalle quale viene trasmesso il segnale. 2. Indicatore di trasmissione L’indicatore lampeggia per confermare l’invio dell’ultimo valore al condizionatore. 3. Tasto “ON/OFF” Premere una volta per accendere il condizionatore.Premere ancora per spegnerl...
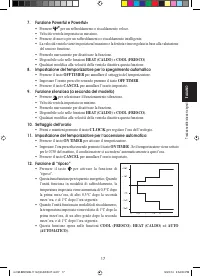
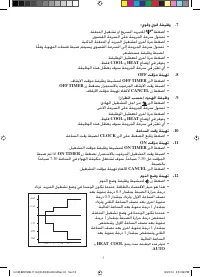
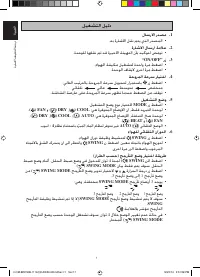
17 IT ALIANO Traduzione delle istruzioni originali +2 C +1 C - 1 C - 2 C 0 0,5 1 1,5 2 - 3 C 7. Funzione Powerful e Powerful+ Premere per un reffreddamento o riscaldamento veloce. Velocità ventola impostata su massimo.Premere di nuovo per un raffreddamento o riscaldamento intelligente.La velocità v...
Altri modelli di condizionatori d'aria Daikin
-
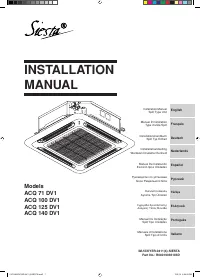 Daikin ACQ-D
-
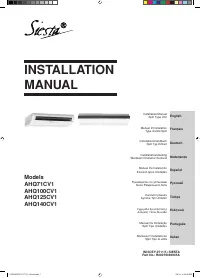 Daikin AHQ-C
-
 Daikin ARXN-MB
-
 Daikin ATXN-MB
-
 Daikin EWAD-C-SL
-
 Daikin EWAD-D-HS
-
 Daikin EWAD-D-SL
-
 Daikin EWAD-D-SR
-
 Daikin EWAD-D-SS
-
 Daikin EWAD-D-SX