Pagina 3 - “IMPORTANTI ISTRUZIONI DI SICUREZZA”; Leggere tutte le istruzioni prima dell’uso.; PERICOLO; sempre la presa elettrica dopo l’utilizzo e prima della pulizia.; ATTENZIONE; viene utilizzata da o vicino ad un bambino.; CONSERVATE QUESTE ISTRUZIONI
Italiano “IMPORTANTI ISTRUZIONI DI SICUREZZA” Quando usate la macchina per cucire, occorre osservare sempre le elementari norme di sicurezza, compreso quanto segue. Leggere tutte le istruzioni prima dell’uso. PERICOLO - - Per ridurre il rischio di scosse elettriche. 1. Non lasciare incustodita la ma...
Pagina 4 - INDICE
4 Italiano INDICE ELENCO DEI COMPONENTI Modelli con selettore laterale deipunti ...................................................... 1 ACCESSORI ............................................. 5 PREPARAZIONE Collegamento del pedale e del cavodi alimentazione.................................... 8Inte...
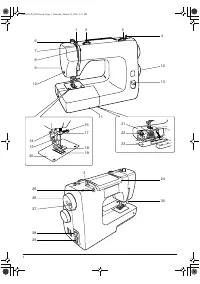
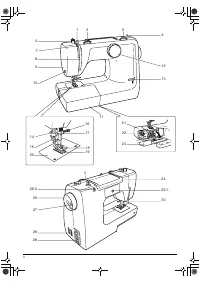
Pagina 6 - NAMES OF PARTS; Side dial type; ELENCO DEI COMPONENTI; Modelli con selettore laterale dei punti; NAAM VAN DE DELEN; Type met knop aan de zijkant; NOMS DES PIECES; Type de machine avec cadran sélecteur le coté
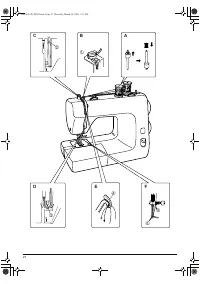
2 Nederlands Italiano English Français NAMES OF PARTS Side dial type 1. Pre-tension2. Upper thread tension dial 3. Spool pin (Removable) 4. Bobbin winder shaft5. Stitch length dial6. Presser foot pressure adjustment knob 7. Take up lever8. Upper tension plate9. Face cover10.Thread cutter11.Extension...
Pagina 9 - NAMES OF ACCESSORIES; Pied libre de broderie; ELENCO DEGLI ACCESSORI; Borduurmaasvoet
6 Nederlands Italiano English Français NAMES OF ACCESSORIES Standard accessories 1. Zigzag sewing foot (on machine) 2. Zipper foot3. Buttonhole foot4. Buttonhole cutter5. Needle plate screw driver 6. Oiler7. Bobbins (3 pcs.) 8. Ball point needle (1 pc.) 9. Standard needle (3 pcs., #14) 10.Screw driv...
Pagina 11 - AANSLUITEN
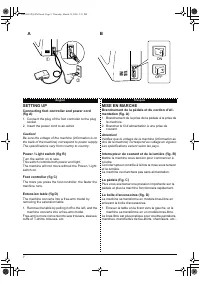
Nederlands Italiano 8 C D AANSLUITEN Aansluiten van voetpedaal en lichtnetsnoer (fig A) 1. Steek de stekker van het voetpedaal in de stekker ingang. 2. Steek de lichtnetsnoer in het stopcontact. Waarschuwing! Overtuig u ervan dat het voltage van de machine (vermeld op de achterkant van de machine) g...
Pagina 13 - VERSCHILLENDE BEDIENINGSELEMENTEN; De hendel zal niet in deze stand blijven staan c; REGOLAZIONI
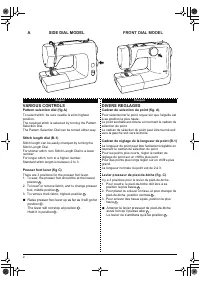
Nederlands Italiano 10 B-1 5 4 3 2 Max 15W c b a C B VERSCHILLENDE BEDIENINGSELEMENTEN Steekkeuzeknop (fig A) Alvorens een steek te kiezen, overtuig u er eerst van dat de naald in de hoogste stand staat.De gewenste steek wordt verkregen door aan de steekkeuzeknop te draaien.De steekkeuzeknop kan zow...
Pagina 15 - THREADING THE MACHINE; Bobbin winding; ENFILAGE DE LA MACHINE; Bobinage de la canette; NOTE; HET INRIJGEN VAN DE MACHINE; Spoeltje opwinden; OPMERKING; PREPARAZIONE PER LA CUCITURA; Riempimento della spolina
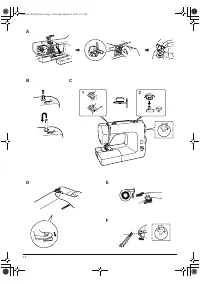
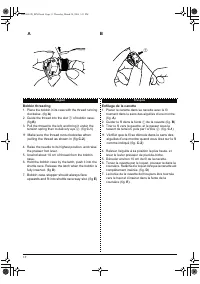
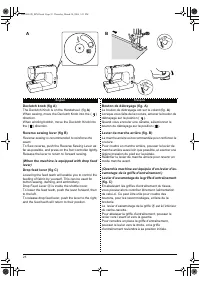
1 2 Nederlands Italiano English Français THREADING THE MACHINE Bobbin winding 1. Set the needle at its highest position by rotating the handwheel towards you. Open the shuttle cover. Hold the latch of bobbin case and pull it out. Release the latch and the bobbin comes out of the bobbin case easily. ...
Pagina 17 - Spoeltje inrijgen
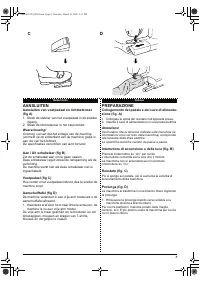
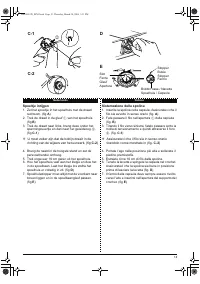
Nederlands Italiano 1 4 ➁ C-1 D C-2 E SlotFenteGleufApertura StopperButéeStopperFermo Bobbin case / NavetteSpoelhuis / Capsula Spoeltje inrijgen 1. Zet het spoeltje in het spoelhuis met de draad rechtsom. (fig A ) 2. Trek de draad in de gleuf 1 van het spoelhuis. (fig B ) 3. Trek de draad naar links...
Pagina 19 - Upper threading
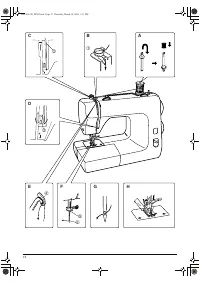
1 6 Nederlands Italiano English Français Upper threading 1. Raise the presser foot lever. Raise the take-up lever to its highest position by rotating the handwheel towards you. 2. Pull out spool pin and insert the shorter side into the machine.Place a spool of thread on spool pin. (fig A ) 3. Pass t...
Pagina 21 - Het gebruik van de draadinrijger; naald
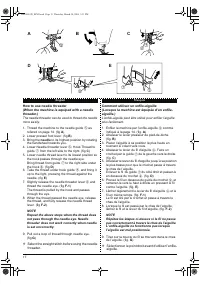
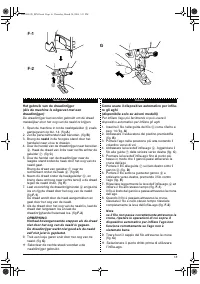
Nederlands Italiano 1 8 ➅ F-1 F-2 G Het gebruik van de draadinrijger (Als de machine is uitgerust met een draadinrijger) De draadinrijger kan worden gebruikt om de draad makkelijker door het oog van de naald te krijgen. 1. Span de machine in tot de naaldgeleider 5 zoals aangegeven op blz. 14. (fig A...
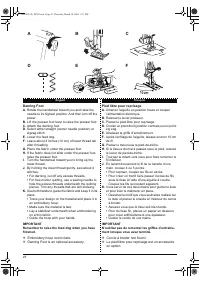
Pagina 22 - Bringing up lower thread with presser foot up
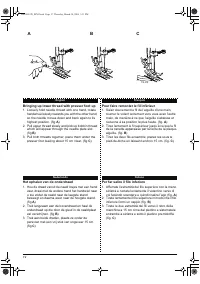
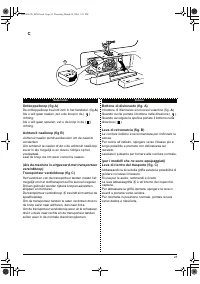
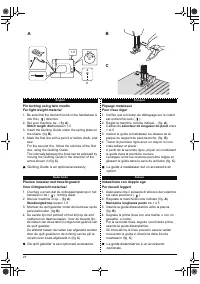
1 9 English Français Nederlands Italiano 15 cm A B C Bringing up lower thread with presser foot up 1. Loosely hold needle thread with one hand, rotate handwheel slowly towards you with the other hand, so the needle moves down and back again to its highest position. (fig A ) 2. Pull upper thread slow...
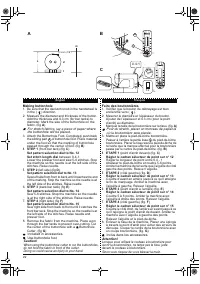
Pagina 23 - SEWING BASICS; C D
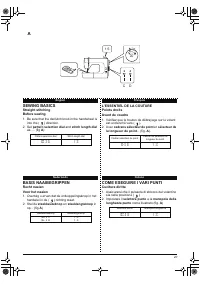
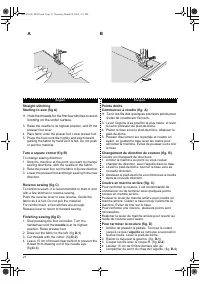
20 English Français Nederlands Italiano 1-5 4 3 A SEWING BASICS Straight stitchingBefore sewing 1. Be sure that the declutch knob in the handwheel is into the ( ) direction. 2. Set pattern selection dial and stitch length dial as..... (fig A ) Pattern selection dial Stitch length dial No. 3 CNo. 4 D...
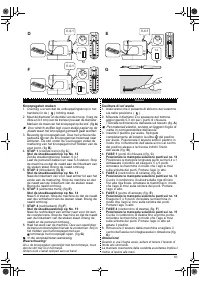
Pagina 25 - Recht naaien
Nederlands Italiano 22 15 cm C D-1 D-2 D-3 Recht naaien Beginnen met naaien (fig A) ❈ Houd de draden vast voor de eerste paar steken om knopen aan de onderkant te voorkomen. 3. Breng de naald in de hoogste stand en zet de persvoethendel omhoog. 4. Leg de stof onder de persvoet. Plaats de persvoethen...
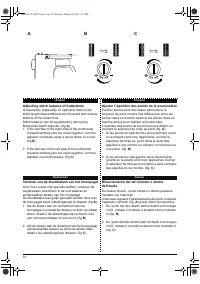
Pagina 27 - Regolazione della tensione dei fili
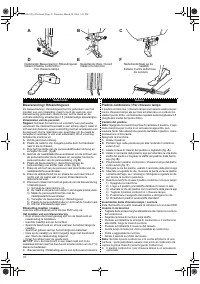
Nederlands Italiano 24 Regolazione della tensione dei fili Una buona cucitura si ottiene quando le tensioni sono ben bilanciate ed entrambi i fili (filo superiore e filo inferiore) sono incrociati insieme al centro del tessuto.Al termine della cucitura controllate se il filo superiore ed inferiore s...
Pagina 30 - Presser foot pressure adjustment knob (fig A)
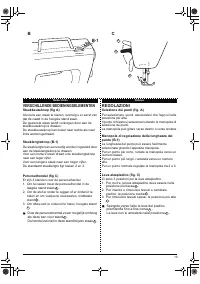
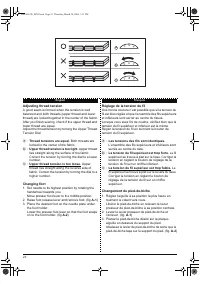
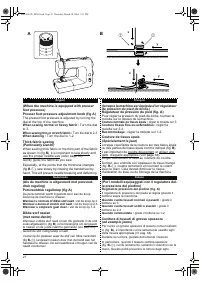
27 English Français Nederlands Italiano ➀ ➀ x y x y A B (When the machine is equipped with presser foot pressure) Presser foot pressure adjustment knob (fig A) The presser foot pressure is adjusted by turning the dial at the top of the machine. When sewing normal or heavy fabric : Turn the dial to 3...
Pagina 31 - E F G; P Q U
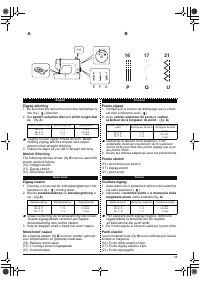
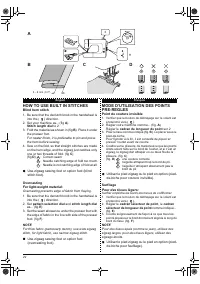
28 English Français Nederlands Italiano 1-5 5 7 6 16 17 21 B A Zigzag stitching 1. Be sure that the declutch knob in the handwheel is into the ( ) direction. 2. Set pattern selection dial and stitch length dial as... (fig A ) Slightly loosen upper thread tension. Betterlooking zigzag stitches requir...
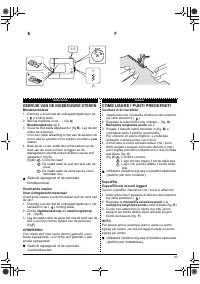
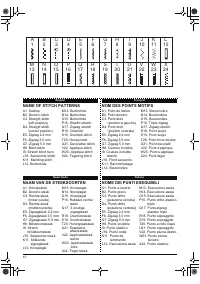
Pagina 33 - COME USARE I PUNTI PREDEFINITI; Cucitura orlo invisibile; Sopraffilo dei tessuti leggeri; Il punto sopraffilo impedisce che i bordi si sfilaccino; GEBRUIK VAN DE INGEBOUWDE STEKEN; Blindzoomsteek; Voor lichtgewicht materiaal:
Nederlands Italiano 30 COME USARE I PUNTI PREDEFINITI Cucitura orlo invisibile 1. Assicurarsi che il pulsante di sblocco del volantino sia nella posizione ( ) 2. Regolate la macchina come indicato... (fig. A ) Manopola lunghezza punto sul 2 3. Piegate il tessuto come mostrato in (fig. B ) e collocat...
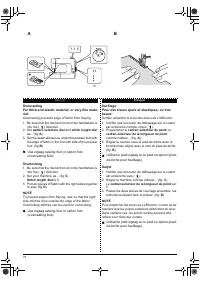
Pagina 35 - Overhands naaien; Sopraffilo; Sopraffilo di tessuti spessi o elastici; Sopraggitto
Nederlands Italiano 32 5 19 D C Overhands naaien Voor dik en elastisch materiaal, of zeer fijn ma-teriaal: Overhands naaien voorkomt rafelen aan de rand vande stof. 1. Overtuig u ervan dat de ontkoppelingsknop in het handwiel in de ( ) richting staat. 2. Zet de steekkeuzeknop en steeklengteknop op.....
Pagina 36 - Smocking; Stitch length dial; Fronçage; sélecteur de longueur du point; Rimpelen; Steeklengteknop; Cucitura plissé; Manopola lunghezza punto
33 English Français Nederlands Italiano 5 20 B A C Smocking 1. Be sure that the declutch knob in the handwheel is into the ( ) direction. 2. Sew two straight lines with very loose thread tension. Make knots in one end. (Long stitch) 3. Gather fabric towards the knots while holding the other end of l...
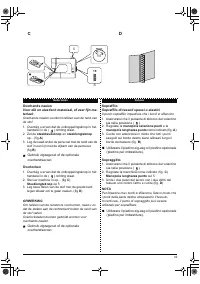
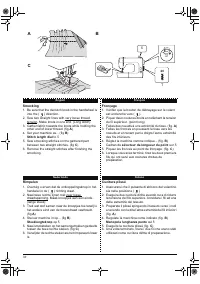
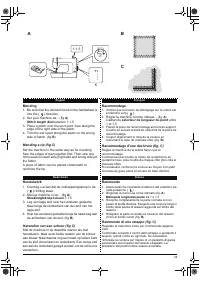
Pagina 37 - Mending; Racommodage; Herstelwerk; Steeklengteknop tussen; Rammendo
34 English Français Nederlands Italiano 1-1.5 11 B A C Mending 1. Be sure that the declutch knob in the handwheel is into the ( ) direction. 2. Set your machine as... (fig A ) Stitch length dial between 1-1.5 3. Place a patch over the worn part. Sew along the edge of the right side of the patch. 4. ...
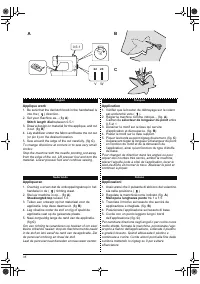
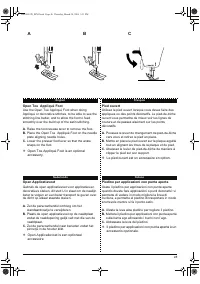
Pagina 38 - Applique work; Application; Applicazioni; Appliqueren; V W
35 English Français Nederlands Italiano 0.5-1 22 23 B A C Applique work 1. Be sure that the declutch knob in the handwheel is into the ( ) direction. 2. Set your machine as... (fig A ) Stitch length dial between 0.5-1 3. Draw a design on material for the applique, and cut it out. (fig B ) 4. Lay sta...
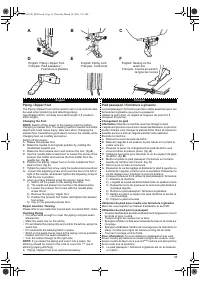
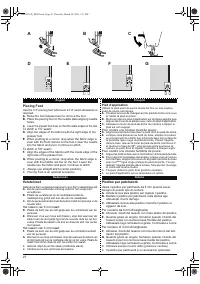
Pagina 40 - Piedino cordoncino / Per chiusure lampo; Biesversiering / Ritssluitingvoet
Nederlands Italiano 3 7 Piedino cordoncino / Per chiusure lampo Il piedino cordoncino / chiusure lampo può essere usato sia per cucire chiusure lampo sia per fare ed attaccare un cordoncino. Usate il punto dritto, normalmente regolato sulla llunghezza 2.5 (lunghezza media del punto dritto) Cambio de...
Pagina 43 - Borduren; Ricami
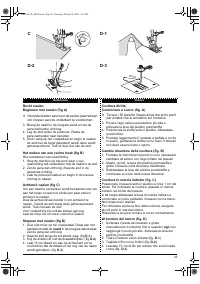
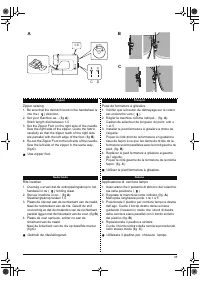
Nederlands Italiano 40 Borduren 1. Overtuig u ervan dat de ontkoppelingsknop in het handwiel in de ( ) richting staat. 2. Verzink de transporteur. (zie pag. 24) 3. Stel uw machine in voor satijnsteek. (fig A ) Steeklengteknop op 0 4. Verminder voorzichtig de bovendraadspanning om te voorkomen dat de...
Pagina 47 - Walking Foot
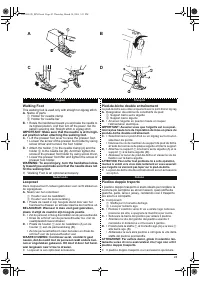
44 English Français Nederlands Italiano A B C D Walking Foot This walking foot is used only with straight or zigzag stitch. A. Name of parts 1 Holder for needle clamp 2 Holder for needle bar B. • Rotate the handwheel toward you and raise the needle to its highest position. And then turn off the powe...
Pagina 49 - Il cerchietto da ricamo non è incluso.; Maasvoet; Borduurhoepel niet inbegrepen.
Nederlands Italiano 46 Piedino per rammendo A. Ruotare il volantino verso di voi e alzate l’ago nella sua posizione plù alta, e spegnete la macchina per cucire. B. Sollevare la barra del piedino per alzare il piedino. C. Mettete il piedino per il rammendo. D. Selezionate un qualsiasi punto dritto (c...
Pagina 53 - Cucitura di un’asola; In de accessoireset aanwezig.
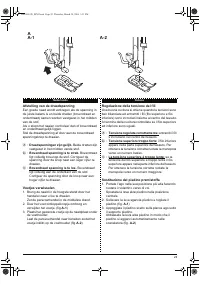
Nederlands Italiano 50 Cucitura di un’asola 1. Assicurarsi che il pulsante di sblocco del volantino sia nella posizione ( ). 2. Misurate il diametro e lo spessore del bottone aggiungendo 0,3 cm per i punti di chiusura. Tracciate la dimensione dell’asola sul tessuto (fig. A ) Per materiali elastici, ...
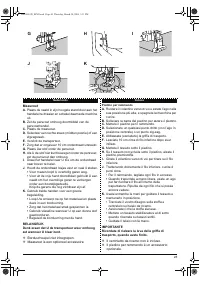
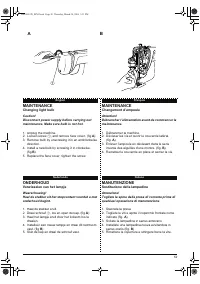
Pagina 56 - Cleaning; Schoonmaken; Nettoyage
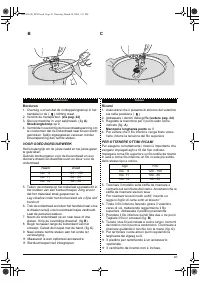
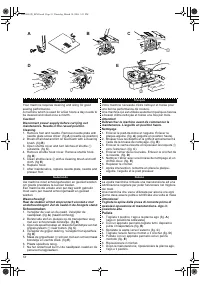
5 3 English Français Nederlands Italiano ➁ ➀ A B C D E Your machine requires cleaning and oiling for good sewing performance.A machine which is used for a few hours a day needs to be cleaned and oiled once a month. Caution!Disconnect power supply before carrying out maintenance. Needle in the raised...
Pagina 57 - Oiling
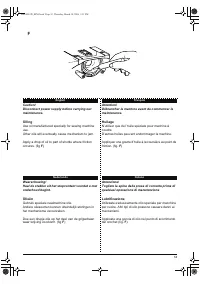
54 English Français Nederlands Italiano F Caution!Disconnect power supply before carrying out maintenance. Oiling Use oil manufactured specially for sewing machine use.Other oils will eventually cause mechanism to jam. Apply a drop of oil to part of shuttle where friction occures. (fig F ) Attention...
Pagina 58 - TROUBLE SHOOTING; Lower thread tension adjustment; STORINGEN VERHELPEN; Onderdraad spannings afstelling; PICCOLI INCONVENIENTI; Regolazione della tensione inferiore; SOLUTIONS DE DEPANNAGE; Réglage de la tension du fil inférieur
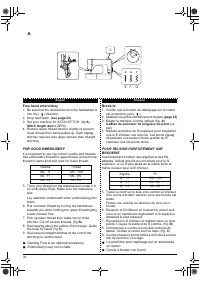
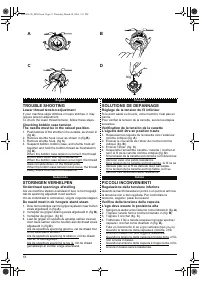
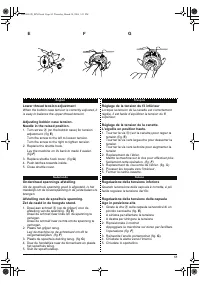
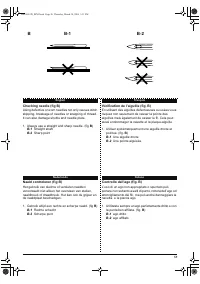
55 English Français Nederlands Italiano 30g A B C D TROUBLE SHOOTING Lower thread tension adjustment If your machine skips stitches or loops stitches, it may require tension adjustment.To check the lower thread tension, follow these steps. Checking bobbin case tensionThe needle must be in the raised...
Pagina 62 - Cleaning the shuttle race
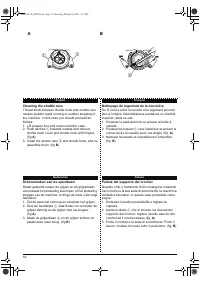
59 English Français Nederlands Italiano ➀ ➀ ➁ A B Cleaning the shuttle race Thread stuck between shuttle hook and shuttle race causes sudden rapid running or sudden stopping of the machine. In this case you should proceed as follows:1. Lift presser foot and remove bobbin case.2. Push latches 1 towar...
Pagina 63 - Piccoli inconvenienti
6 3 Italiano Piccoli inconvenienti ❈ Se l’inconveniente persiste, rivolgetevi a personale tecnico per l’assistenza. Non cercate di riparare il guasto da soli PROBLEMA POSSIBILE CAUSA RIMEDIO Rottura del filo inferiore Il filo è avvolto male sulla spolina o non è risalito correttamente Tensione ecces...
Pagina 64 - MODEL
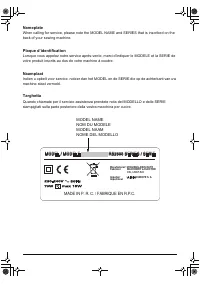
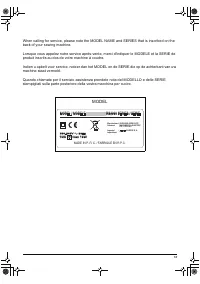
64 When calling for service, please note the MODEL NAME and SERIES that is inscribed on theback of your sewing machine. Lorsque vous appelez notre service après-vente, merci d'indiquer le MODELE et la SERIE deproduit inscrits au dos de votre machine à coudre. Indien u opbelt voor service, noteer dan...
Pagina 68 - HERGEBRUIK; RICICLAGGIO
Nederlands Italiano 69 ޓ GOOI DIT NIET WEG!NON SPRECHIAMO NULLA! HERGEBRUIK Wij hebben de verplichting om het milieu te beschermen. Wij moeten streven naar een minimale milieubelasting door onze producten constant te verbeteren voor wat betreft het productontwerp en fabricage methode. Het zich ontdo...