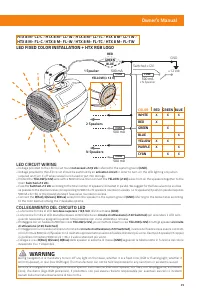
FUSE; RED; Speakers; LED CIRCUIT WIRING; activation circuit; COLLEGAMENTO DEL CIRCUITO LED; non deve superare i 12,5 Vdc; COLOR; LED FIXED COLOR INSTALLATION + HTX RGB LOGO - Hertz HTX8-FL-TC - Manuale d'uso - Pagina 23


Indice:
- Pagina 7 – Hungarian; Italian
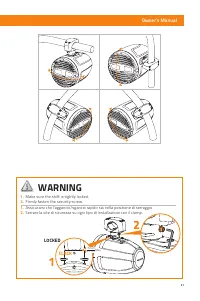
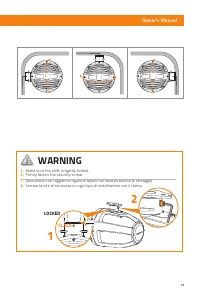
- Pagina 17 – Make sure the shift is tightly locked.; LOCKED
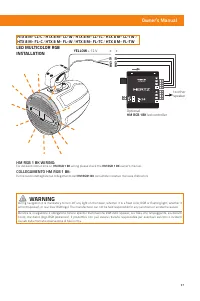
- Pagina 21 – R R; to other; HM RGB 1BK; led controller; YELLOW; For detailed instructions on; wiring please check the; HM RGB 1 BK; COLLEGAMENTO HM RGB 1 BK:; Per istruzioni dettagliate sul collegamento dell’; HM RGB1 BK; consultate il relativo manuale d’istruzioni.; LED MULTICOLOR RGB
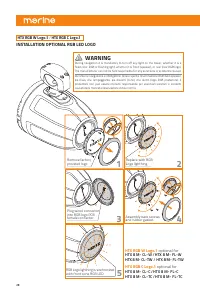
- Pagina 22 – INSTALLATION OPTIONAL RGB LED LOGO
- Pagina 23 – FUSE; RED; Speakers; LED CIRCUIT WIRING; activation circuit; COLLEGAMENTO DEL CIRCUITO LED; non deve superare i 12,5 Vdc; COLOR; LED FIXED COLOR INSTALLATION + HTX RGB LOGO
29
Owner’s Manual
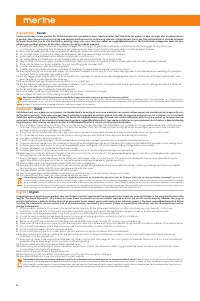
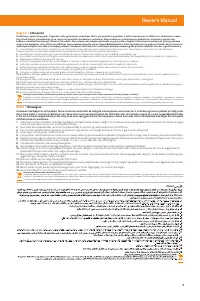
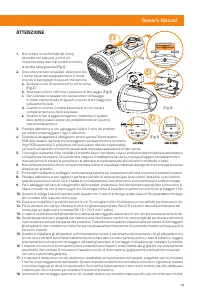
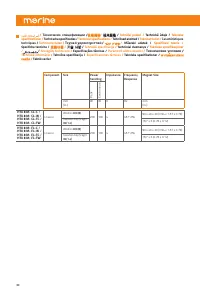
FUSE
FUSE
FUSE
FUSE
RED
GREEN
BLUE
YELLOW (+ 12 V)
+ 12 Vdc
Switched +12V
GND
500 mA
500 mA
500 mA
2 Speakers
1 Speaker
N Speakers
500 mA
x N Speaker
LED CIRCUIT WIRING
-
Voltage provided to the LED circuit must
not exceed +12,5 Vdc
referred to the system ground
(GND)
.
-
Voltage provided to the LED circuit should be switched by an
activation circuit
in order to turn-on the LED lighting only when
required and turn it off when vessel is not used or put into storage.
-
Protect the
YELLOW (+12V)
wire with a 500mA fuse, then connect the
YELLOW (+12V)
wires from all the speakers together to the
main
Switched +12 Vdc
.
-
Fuse the
Switched +12 Vdc
according to the total number of speakers connected in parallel. We suggest for the fuse value to be as close
as possible to the standard value corresponding to 500mA x N speakers rounded in excess. I.e. 6 speakers (3 pairs) in parallel requires
500mA x 6 = 3A, or the closest standard fuse value rounded in excess.
-
Connect the
R(Red), G(Green), B(Blue)
wires from the speaker to the system ground
(GND)
referring to the below table according
to the color desired among the 7 available options.
COLLEGAMENTO DEL CIRCUITO LED
-
La tensione fornita al LED
non deve superare i 12,5 Vdc
riferiti a massa
(GND)
.
-
La tensione fornita al LED dovrebbe essere controllata da un
circuito di attivazione (+12V Switched)
per accendere il LED solo
quando necessario e spegnerlo quando l’imbarcazione non viene utilizzata o rimessa.
-
Proteggere con un fusibile da 500mA il cavo
YELLOW (+12V)
, poi connettere insieme i cavi
YELLOW (+12V)
di tutti gli speaker
al circuito
di attivazione (+12V Switched)
.
-
Proteggere con un fusibile la tensione fornita dal
circuito di attivazione (+12V Switched)
, il valore del fusibile deve essere calcolato
con la formula 500mA x N Speaker con il risultato approssimato al valore di fusibile standard più vicino. Esempio 6 speaker (3 coppie)
in parallelo richiedono 500mA x 6 = 3A o il valore standard più vicino.
-
Collegare i cavi
R(Red), G(Green), B(Blue)
dallo speaker al sistema di massa
(GND)
seguendo la tabella sotto in funzione del colore
desiderato tra i 7 disponibili.
COLOR
RED GREEN BLUE
WHITE
X
X
X
RED
X
GREEN
X
BLUE
X
YELLOW
X
X
PURPLE
X
X
CYAN
X
X
LED FIXED COLOR INSTALLATION + HTX RGB LOGO
During navigation it is mandatory to turn off any light on the tower, whether it is a fixed color, RGB or flashing light, whether it
is front (speaker), or rear (rear RGB logo). The manufacturer can not be held responsible for any sanctions or accidents caused.
Durante la navigazione è obbligatorio tenere spenta l’illuminazione RGB dello speaker, sia fissa, che lampeggiante, sia davanti
(cono), che dietro (logo RGB posteriore). Il produttore non può essere ritenuto responsabile per eventuali sanzioni o incidenti
causati dalla mancata osservazione di tale norma.
WARNING
HTX 8 M- CL-C
/
HTX 8 M- CL-W
/
HTX 8 M- CL-TC
/
HTX 8 M- CL-TW
/
HTX 8 M- FL-C
/
HTX 8 M- FL-W
/
HTX 8 M- FL-TC
/
HTX 8 M- FL-TW
"Caricamento dell'istruzione" significa che è necessario attendere finché il file non è caricato e pronto per la lettura online. Alcune istruzioni sono molto grandi e il tempo di caricamento dipende dalla velocità della tua connessione a Internet.
Sommario
7 Owner’s Manual Útmutató / Hungarian Gratulálunk termékünk megvásárlásához! Az Ön elégedettsége a legfontosabb kritérium, aminek termékeinknek meg kell felelnie: az elégedettség, amit „A hangélmény” hosszabb idejű használata után is érez. Ez a kézikönyv a rendszer megfelelő telepítésére és használa...
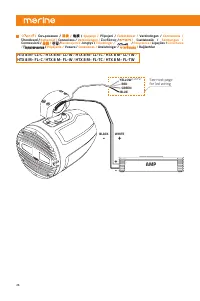
21 Owner’s Manual WARNING 1. Make sure the shift is tightly locked. 2. Firmly fasten the security screw. 1. Assicurarsi che l’aggancio/sgancio rapido sia nella posizione di serraggio. 2. Serrare la vite di sicurezza su ogni tipo di installazione con il clamp. LOCKED 3 mm 0,11 in.Max CLACK 1 2
27 Owner’s Manual + + R R G G B B to other speaker Optional HM RGB 1BK led controller YELLOW + 12 V HM RGB 1 BK WIRING: For detailed instructions on HM RGB 1 BK wiring please check the HM RGB 1 BK owner’s manual. COLLEGAMENTO HM RGB 1 BK: Per istruzioni dettagliate sul collegamento dell’ HM RGB1 BK ...
Altri modelli di altoparlanti Hertz
-
 Hertz HEX6.5 M-C
-
Hertz HEX6.5 M-W
-
 Hertz HEX6.5 S-LD-G
-
Hertz HEX6.5 S-LD-GOB
-
 Hertz HMX 6.5 S-LD-G
-
Hertz HMX 6.5 S-LD-SW
-
 Hertz HMX 6.5 S-LD-TC
-
Hertz HMX 6.5 S-LD-TW
-
Hertz HMX 6.5-TC
-
Hertz HMX 8-LD-TC