OPERATION; DEUTSCH; BESCHREIBUNG - Smeg IS7099X90 - Manuale d'uso - Pagina 6


Indice:
- Pagina 5 – PORT; ADVERTENCIAS
- Pagina 7 – INSTALLAZIONE
- Pagina 8 – FUNZIONAMENTO; ESPAÑOL; DESCRIPCIÓN; INSTALACIÓN
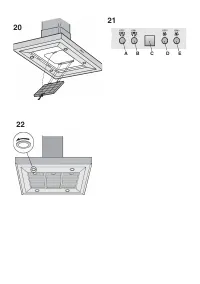
clipping the 2 filter clips into place (Fig.20) and turn the filter upwards. Installation is now complete and the anti-grease
filters can be reassembled.
OPERATION
CONTROLS (Fig. 21):
Key A = switches off lights; if the key is pressed while the lights are on, light intensity drops
as far as zero; if the key is kept pressed for a few seconds, the lights go out. Key B = turns light on.
The lights come on according to the last level of intensity set. By pressing the key while the lights are on, light intensity
increases; by keeping the key pressed for a few seconds, light intensity goes directly to maximum level.
Display C = - indicates the selected speed of the motor (the letter H indicates intensive speed); - indicates triggering
of the Timer when the point flashes; - indicates the filter alarm when the letter “F” appears (with motor off).
Key D = motor stop / filter alarm reset / timer; by pressing the key while the motor is running: motor speed drops to zero;
by keeping the key pressed for about 2 seconds (until the speed number disappears off the screen), the motor stops;
by keeping the key pressed for about 5 seconds, the TIMER is engaged, and consequently after 5 minutes the motor
stops (the point flashes on the screen). By pressing the key with the motor off, during alarm display, the filter alarm is
RESET, and the hour count starts again. Key E = starts the motor (at 3rd speed because this is considered best); by
pressing the key while the motor is running, the motor speed increases; by keeping the key pressed for a few seconds,
the motor goes directly to top speed. Grease filter alarm: the letter “F” appears on the screen, after which the alarm goes
off and reappears when the motor is switched off again. This indicates 30 hood operating hours have passed and the grease
filters need cleaning. Charcoal filter alarm: the letter “F” flashes on the screen, after which the alarm goes off and reappears
when the motor is switched off again. This indicates 120 hours of hood operation have passed and the charcoal filters
need replacing (filter version appliances) and the grease filters need cleaning.
Grease filters
: special attention must be given to the grease filters which must be periodically cleaned, whenever
the grease filter alarm trips. For Filter alarm instructions, refer to the Controls paragraph.
To remove the filters: press inward on the clamps at the handles and pull the filter downward (Fig. 4). Wash out the filter
using a neutral soap.
Charcoal filter
: if the filtering version appliance is used, the charcoal filters will have to be periodically
replaced when the charcoal filter alarm trips. For instructions on the filter Alarm, refer to the Controls paragraph.
Removing the charcoal filter: to remove them press inward on the clamp (Fig. 20) and rotate the filter downward until the
2 tabs can be removed from the housing.
Lighting
: to remove the
halogen lamps
, turn the locknut counter-clockwise (Fig. 22). Replace with the same
type of lamp.
DEUTSCH
BESCHREIBUNG
Diese Haube wurde so konzipiert, dass sie unter allen Betriebsbedingungen optimale Leistungen erbringt:
bei mittleren Geschwindigkeiten bietet sie ein optimales Verhältnis zwischen angesaugter Luftmenge,
S t r o m v e r b r a u c h u n d G e r ä u s c h b e l a s t u n g . H o h e G e s c h w i n d i g k e i t e n s i n d h i n g e g e n b e i s t a r k e r
Kochdampfentwicklung zu wählen; sie können auch über längere Zeiten eingeschaltet bleiben.
Das Gerät kann in Umluftversion, in Abluftversion und in der Version mit externem Motor geliefert werden.
Bei
Umluftversion
werden die durch das Gerät beförderten Dünste und die Abluft durch die Kohlefilter gereinigt
und durch die Lüftungsgitterchen des Rohres wieder in den Raum zurückgeführt (Abb. 1). ZU BEACHTEN: Bei der
Benutzung der Umluftversion müssen ein Kohlefilter sowie ein Luftleitblech verwendet werden (Abb. 1A) das, am
oberen Teil der Haube angebracht, die Wiedereinleitung der Luft in den Raum gestattet. Im
Abluftversion
wird
der Kochdunst durch Abluftrohre ins Freie geleitet (Abb. 2). In der Version mit
externem Motor
(Abb. 3) ist das
Gerät mit einer Aspirationszentrale zu verbinden, die getrennt arbeitet und das Gerät als Verbindungsbasis für die
abzuleitende Luft benutzt.
Bitte verwenden Sie nur eine der im Originalkatalog vorgeschlagenen Zentralen.
Warnung: Die Nichtbeachtung der Schrauben oder Fixiervorrichtung in Übereinstimmung mit diesen Anweisungen
nicht installieren kann zu elektrischen Gefährdungen führen.
INSTALLATION
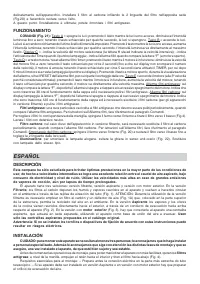
ACHTUNG: Für die Montage sind wenigstens 3 Personen erforderlich. Es wird empfohlen, die Montage von
Fachkräften durchführen zu lassen. Wir empfehlen, jeden Arbeitsgang der Installation zu verfolgen und sich
bei deren Beendigung zu versichern, dass der Apparat absolut tadellos befestigt ist.
Vor den Montageoperationen müssen zur leichteren Handhabung des Geräts die
Fettfilter
entfernt werden: Den
Festhalter in der Nähe des Griffs nach innen drücken und den Filter nach unten ziehen (Abb.4).
Wichtige Vorbedingungen für das Montieren: – Innerhalb des Teleskoprohrs ist der Anschluß für die Stromversorgung
vorzubereiten. – Wird ein Gerät in Aspirationsversion oder in der Version mit externem Motor installiert, ist eine
Luftaustrittsöffnung vorzusehen.
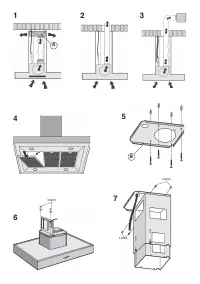
Zum Erzielen optimaler Bedingungen für die Abluftversion und die Version mit externem Motor ist ein
Luftaustrittsrohr
zu benutzen, das über die unbedingt erforderliche Mindestlänge, eine möglichst geringe Krümmungszahl (maximaler
Krümmungswinkel von 90°), ein genormtes Material (gemäß dem Herkunftsland) und eine möglichst glatte Innenfläche
verfügt. Außerdem wird von drastischen Querschnittänderungen abgeraten (Durchmesser 150 mm).
"Caricamento dell'istruzione" significa che è necessario attendere finché il file non è caricato e pronto per la lettura online. Alcune istruzioni sono molto grandi e il tempo di caricamento dipende dalla velocità della tua connessione a Internet.
Sommario
6 USO Evitare l’uso di materiali che causano fiammate (flambè) nelle immediate vicinanze dell’apparecchio. Non cucinare al “flambè” sotto la cappa Nel caso di fritture fare particolarmente attenzione al pericolo di incendio che costituiscono olio e grassi. Particolarmente pericoloso per la sua infia...
in circolazione nell’ambiente attraverso le grigliette di areazione del tubo (Fig. 1). ATTENZIONE: Nell’uso in versionefiltrante è necessario utilizzare un filtro al carbone ed un deflettore aria (Fig. 1A) che, posto nella parte superioredella struttura, permetta il riciclo dell'aria nell'ambiente. ...
delicatamente sull'apparecchio. Installare il filtro al carbone infilando le 2 linguette del filtro nell'apposita sede(Fig.20) e facendolo ruotare verso l'alto.A questo punto l'installazione è ultimata; potete rimontare i filtri antigrasso. FUNZIONAMENTO COMANDI (Fig. 21): Tasto A = spegne le luci; ...