Electrolux XXLBOX14 - Manuale d'uso - Pagina 20
 2
2
 3
3
 4
4
 5
5
 6
6
 7
7
 8
8
 9
9
 10
10
 11
11
 12
12
 13
13
 14
14
 15
15
 16
16
 17
17
 18
18
 19
19
 20
20
 21
21
 22
22
 23
23
 24
24
 25
25
 26
26
 27
27
 28
28
 29
29
 30
30
 31
31
 32
32
 33
33
 34
34
 35
35
 36
36
 37
37
 38
38
 39
39
 40
40
 41
41
 42
42
 43
43
 44
44
 45
45
 46
46
 47
47
 48
48
 49
49
 50
50
 51
51
 52
52
 53
53
 54
54
 55
55
 56
56
 57
57
 58
58
 59
59
 60
60
 61
61
 62
62
 63
63
 64
64
 65
65
 66
66
 67
67
 68
68
 69
69
 70
70
 71
71
 72
72
 73
73
 74
74
 75
75
 76
76
 77
77
 78
78
 79
79
 80
80
 81
81
 82
82
 83
83
 84
84
 85
85
 86
86
 87
87
 88
88
 89
89
 90
90
 91
91
 92
92
 93
93
 94
94
 95
95
 96
96
 97
97
 98
98
 99
99
 100
100
 101
101
 102
102
 103
103
Indice:
- Pagina 44 – Italiano; Prima di cominciare; Ελληνικά; Πριν την εκκίνηση
- Pagina 46 – Per ottenere i migliori risultati.; Για να επιτύχετε τα καλύτερα αποτελέσματα.
- Pagina 48 – raccoglipolvere s-bag®
- Pagina 52 – TwinTechnology; Sostituzione del sacchetto raccoglipolvere s-bag®; **Εφαρμογή χαρακτηριστικού TwinTechnology; Αντικατάσταση της σακούλας σκόνης, s-bag® μe ErgoboxTM
- Pagina 54 – Sostituzione del filtro o dei filtri; Αντικατάσταση φίλτρων
- Pagina 56 – Pulizia di flessibile e bocchetta; Pulizia della bocchetta per pavimenti; Καθαρισμός του εύκαμπτου σωλήνα και του; Καθαρισμός του ακροφυσίου δαπέδου
- Pagina 58 – Ricerca dei guasti; L'aspirapolvere si spegne; Informazioni per l’utente; Επίλυση; Η ηλεκτρική σκούπα δεν λειτουργεί; Πληροφορίες για τον πελάτη
0
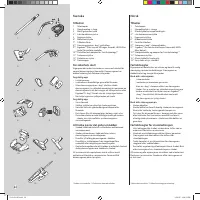
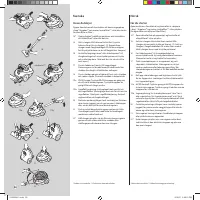
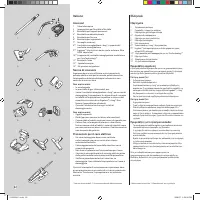
English
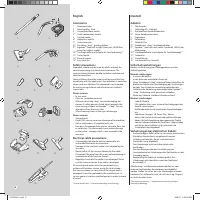
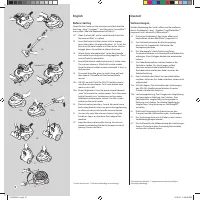
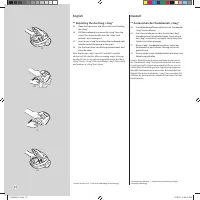
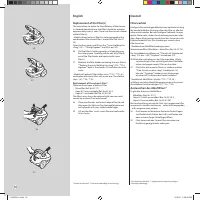
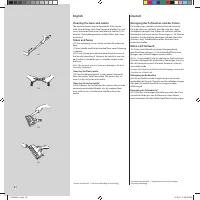
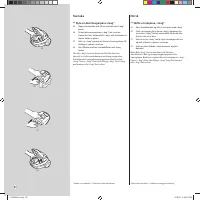
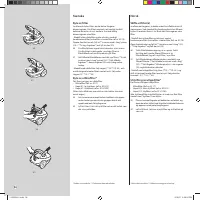
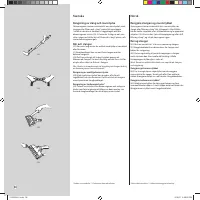
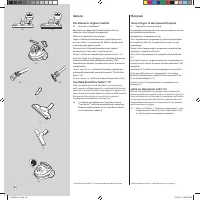
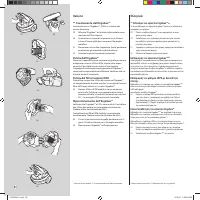
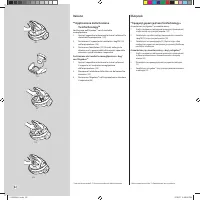
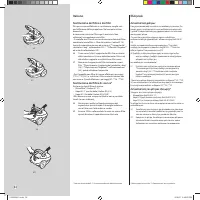
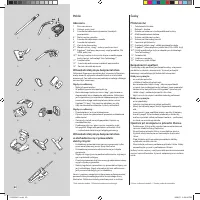
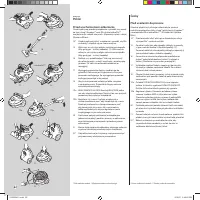
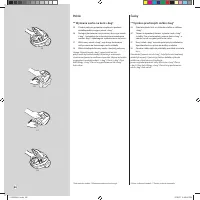
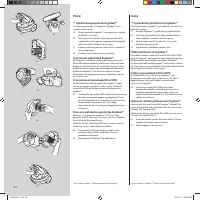
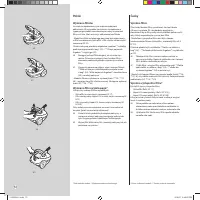
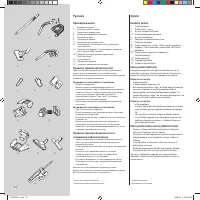
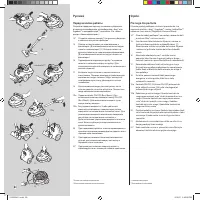
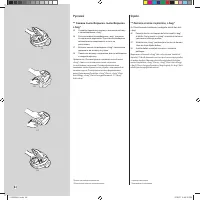
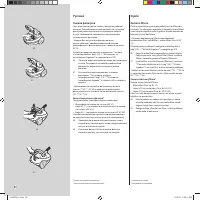
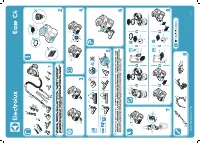
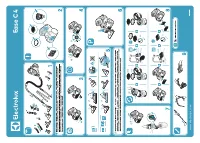
Cleaning the hose and nozzle
The vacuum cleaner stops automatically if the nozzle,
tube, hose or filters and s-bag® becomes blocked. In such
cases, disconnect from mains and allow to cool for 20-30
minutes. Clear blockage and/or replace filters and s-bag®
and restart.
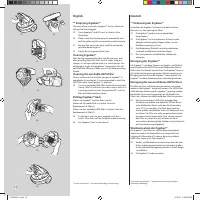
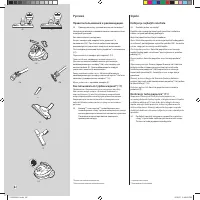
Tubes and hoses
(42) Use a cleaning strip or similar to clear the tubes and
hose.
(2) Hose handle could be dismantled from hose if cleaning
is needed.
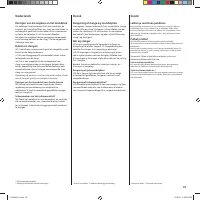
(43) It may also be possible to remove the obstruction in
the hose by squeezing it. However, be careful in case the
obstruction is caused by glass or needles caught inside
the hose.
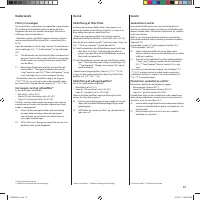
Note: The warranty does not cover any damage to the hose
caused by cleaning it.
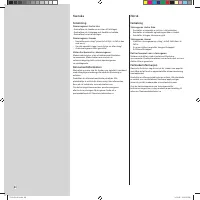
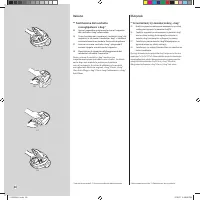
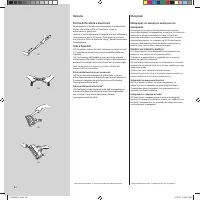
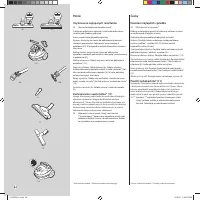
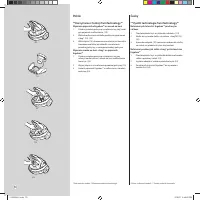
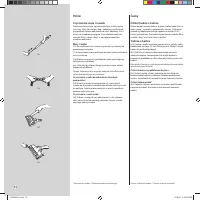
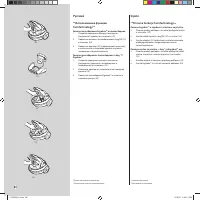
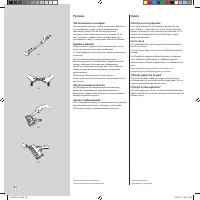
Cleaning the floor nozzle
(44) To avoid deterioration of suction power, frequently
clean the carpet/ hard floor nozzle. The easiest way to
clean it is by using the hose handle.
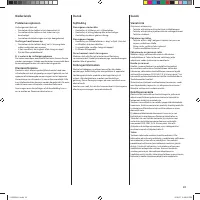
Cleaning the turbo nozzle*
(45) Disconnect the nozzle from the vacuum cleaner tube
and remove entangled threads, etc. by snipping them
away with scissors. Use the hose handle to clean the
nozzle.
* Certain models only. ** Execution depending on technology
42.
43.
44.
45.
Deutsch
Reinigung des Schlauches und der Düsen
Der Staubsauger schaltet sich automatisch ab, wenn die
Düse, das Rohr, der Schlauch, der Filter oder der s-bag®-
Staubbeutel verstopft sind. Ziehen Sie in diesem Fall den
Netzstecker und lassen Sie den Staubsauger 20 - 30 Minuten
abkühlen. Die Verstopfung beseitigen und/oder den Filter
und den s-bag®-Staubbeutel ersetzen, dann das Gerät
erneut einschalten.
Rohre und Schlauch
(42) Rohre und Schlauch mit einem Reinigungsband
oder Ähnlichem reinigen. (2) Der Schlauchgriff kann zum
Reinigen vom Schlauch abgenommen werden.
(43) Es ist auch möglich, die Verstopfung im Schlauch durch
Drücken und Biegen des Schlauches zu beseitigen. Vorsicht,
falls die Verstopfung durch Glas oder Nadeln im Schlauch
verursacht wurde.
Hinweis: Die Garantie deckt keine durch Reinigung verursachte
Schäden am Schlauch ab.
Reinigung der Bodendüse
(44) Um ein Nachlassen der Saugleistung zu vermeiden,
regelmäßig die Düse für Teppiche und harte Böden reinigen.
Dies geht am einfachsten durch aussaugen mit dem
Schlauchgriff.
Reinigung der Turbobürste*
(45) Düse vom Staubsaugerrohr entfernen und in der Düse
verwickelte Fäden etc. zum Entfernen mit einer Schere
durchschneiden. Mit dem Schlauchgriff die Düse absaugen.
* Nur bestimmte Modelle. ** Vorgehensweise von der jeweiligen
Technologie abhängig
2192924-01.indd 20
2/13/07 4:39:49 PM
"Caricamento dell'istruzione" significa che è necessario attendere finché il file non è caricato e pronto per la lettura online. Alcune istruzioni sono molto grandi e il tempo di caricamento dipende dalla velocità della tua connessione a Internet.
Sommario
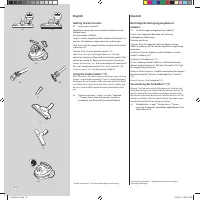
44 cordmatic™ 14. 15. 16. 17. 18. 19a. 19b. 21. 22. 20. * Μόνο ορισμένα μοντέλα. ** Εξαρτάται από την τεχνολογία * Solo per alcuni modelli. ** L'esecuzione dipende dalla tecnologia. Italiano Prima di cominciare Aprire il coperchio anteriore della macchina e assicurarsi che il sacchetto raccoglipolve...
46 40. 41. 23. 4a. 5. 4b. 11. 12 24. Italiano Per ottenere i migliori risultati. 23 Accessori in dotazione*Bocchetta per tappezzeria e bocchetta per fessure, collocate sotto il coperchio pieghevole.Utilizzare le bocchette come segue: Tappeti: Utilizzare la bocchetta per tappeti/pavimenti duri con la...
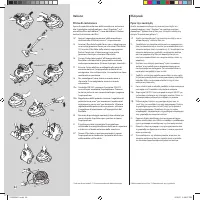
48 25. 26. 27. 28. * Μόνο ορισμένα μοντέλα. ** Εξαρτάται από την τεχνολογία * Solo per alcuni modelli. ** L'esecuzione dipende dalla tecnologia. Italiano ** Sostituzione del sacchetto raccoglipolvere s-bag® 25 Aprire il coperchio anteriore ed estrarre il supporto del sacchetto s-bag®sollevandolo. 26...
Altri modelli di aspirapolveri Electrolux
-
 Electrolux Clario
-
 Electrolux Clario 2001MN
-
 Electrolux EC41-2SW
-
 Electrolux EC41-4T
-
 Electrolux EC41-ANIM
-
 Electrolux EC41-H2SW
-
 Electrolux EER73DB
-
 Electrolux EER73IGM
-
 Electrolux PC91-8STM
-
 Electrolux PD91-8SSM