Artusi AO900X - Manuale d'uso - Pagina 27


Indice:
27
IT
GB
FR
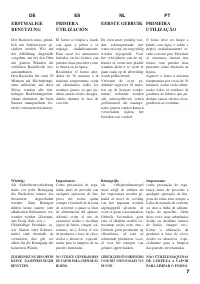
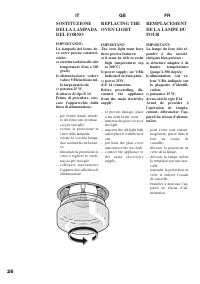
SOSTITUZIONE
DELLA LAMPADA
DEL FORNO
IMPORTANTE:
La lampada del forno de-
ve avere precise caratteri-
stiche:
a) struttura adatta alle alte
temperature (fino a 300
gradi)
b) alimentazione: vedere
valore V/Hz indicato sul-
la targa matricola
c) potenza 25 W.
d) attacco di tipo E 14
Prima di procedere, stac-
care l’apparecchio dalla
linea di alimentazione.
- per evitare danni, stende-
re nel forno uno strofinac-
cio per stoviglie
- svitare la protezione in
vetro della lampada
- svitare la vecchia lampa-
da e sostituirla con la nuo-
va
- rimontare la protezione in
vetro e togliere lo strofi-
naccio per stoviglie
- c o l l e g a r e n u o v a m e n t e
l’apparecchio alla linea di
alimentazione.
REPLACING THE
OVEN LIGHT
IMPORTANT:
The oven light must have
these precise features:
a) it must be able to resist
high temperatures (up
to 300
°
C)
b) power supply: see V/Hz
indicated on data plate.
c) power 25W.
d) E 14 connection.
Before proceeding, dis-
connect the appliance
from the main electricity
supply.
- to prevent damage, place
a tea cloth in the oven
- unscrew the glass cover of
the light
- unscrew the old light bulb
and replace it with the new
one
- put back the glass cover
and remove the tea cloth
- connect the appliance to
t h e m a i n e l e c t r i c i t y
supply.
REMPLACEMENT
DE LA LAMPE DU
FOUR
IMPORTANT:
La lampe du four doit ré-
pondre à des caracté-
ristiques bien précises :
a) structure adaptée à de
hautes
températures
(jusqu’à 300 degrés)
b) alimentation: voir va-
leur V/Hz indiquée sur
la plaquette d’identifi-
cation.
c) puissance 25 W.
d) raccord de type E14
Avant de procéder à
l’opération de rempla-
cement, débrancher l’ap-
pareil du réseau d’alimen-
tation,
- pour éviter tout endom-
magement, placer dans le
four
un
essuie
de
vaisselle,
- dévisser la protection en
verre de la lampe,
- dévisser la lampe uséeet
la remplacer par une nou-
velle,
- remonter la protection en
verre et enlever l’essuie
de vaisselle,
- brancher à nouveau l’ap-
pareil au réseau d’ali-
mentation.
ES
NL
PT
DE
AUSWECHSLUNG
DER OFEN-
BELEUCHTUNG
WICHTIG:
Die
Ofenbeleuchtung
muss folgende Merkmale
aufweisen:
a) h o c h t e m p e r a t u r -
beständig (bis zu 300
Grad)
b) Stromversorgung: siehe
Anschlusswerte
V/Hz
auf dem Typenschild.
c) Leistung 25 W
d) Sockel E 14
Das Gerät zuallererst vom
Stromnetz abtrennen.
- Zur Vermeidung von
Schadensfällen, ist im
Ofen ein Geschirrtuch
auszubreiten
- Lampenabdeckung aus
Glas abschrauben
- Alte Lampe abschrauben
und mit einer neuen Be-
leuchtung auswechseln
- L a m p e n a b d e c k u n g
wieder anmontieren und
Geschirrtuch entfernen
- Das Gerät erneut an das
Stromnetz anschließen.
CAMBIO DE LA
BOMBILLA DEL
HORNO
IMPORTANTE:
La bombilla del horno
debe tener unas caracte-
rísticas bien determi-
nadas:
a) estructura apta para
las altas temperaturas
(hasta 300 grados)
b) alimentación: véase el
valor V/Hz indicado en
la chapa de matrícula.
c) potencia 25 W.
d) casquillo de tipo E14
Antes de proceder con el
cambio, se debe desen-
chufar el aparato de la
red eléctrica de alimen-
tación.
- para evitar daños, poner
en el horno un trapo para
vajillas
- desenroscar la protección
en vidrio de la bombilla
- desenroscar
la
vieja
bombilla y cambiarla por
la nueva
- montar de nuevo la pro-
tección en vidrio y quitar
el trapo para vajillas
- enchufar de nuevo el
aparato a la línea de
alimentación.
HET VERVANGEN
VAN HET LAMPJE
VAN DE OVEN
BELANGRIJK:
Het lampje van de oven
dient de volgende ken-
merken te bezitten:
a) een structuur die ge-
schikt is voor hoge tem-
peraturen (tot 300
°
C).
b) voeding: zie de waarde
V/Hz die wordt ver-
meld op de typeplaat
c) vermogen 25 W.
d) aanhechting van het
type E 14
Alvorens hiertoe over te
gaan, dient het apparaat
van de stroom losge-
koppeld te worden.
- om schade te voorkomen,
dient men een theedoek in
de oven te leggen.
- d r a a i d e g l a z e n b e -
scherming van de lamp los
- draai het oude lampje los
en vervang het met een
nieuw
- b r e n g d e g l a z e n b e -
scherming weer aan en
verwijder de theedoek
- sluit het apparaat weer op
de stroom aan.
SUBSTITUIÇÃO
DA LÂMPADA DO
FORNO
IMPORTANTE:
A lâmpada do forno deve
haver características exac-
tas:
a) estrutura adequada às
altas temperaturas (até
300 graus)
b) alimentação: vide valor
V/Hz indicado na placa
de matrícula.
c) potência 25 W.
d) casquilho tipo E 14
Antes de proceder, desli-
gar o aparelho da linha de
alimentação.
- para evitar danos, estender
no forno um pano da louça
- desapertar a protecção em
vidro da lâmpada
- d e s a p e r t a r a l â m p a d a
velha e substituí-la com a
nova
- tornar a montar a pro-
tecção em vidro e tirar o
pano da louça
- ligar novamente o apa-
relho à linha de alimen-
tação.
"Caricamento dell'istruzione" significa che è necessario attendere finché il file non è caricato e pronto per la lettura online. Alcune istruzioni sono molto grandi e il tempo di caricamento dipende dalla velocità della tua connessione a Internet.
Sommario
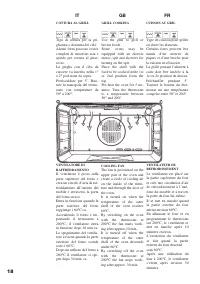
2 IT GB FR IMPORTANTE La targhetta delle caratte-ristiche del forno è accessi-bile anche ad apparecchioinstallato. In questa targhet-ta, visibile aprendo la porta,sono riportati tutti i dati diidentificazione dell’appa-recchio a cui si dovrà fareriferimento per richiesta diricambi.Durante il funzion...
3 IT GB FR IMPORTANTE La targhetta delle caratte-ristiche del forno è accessi-bile anche ad apparecchioinstallato. In questa targhet-ta, visibile aprendo la porta,sono riportati tutti i dati diidentificazione dell’appa-recchio a cui si dovrà fareriferimento per richiesta diricambi.Durante il funzion...
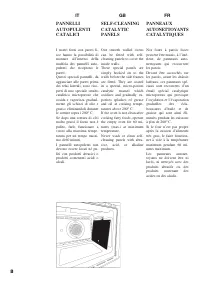
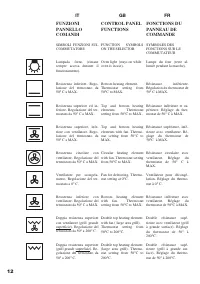
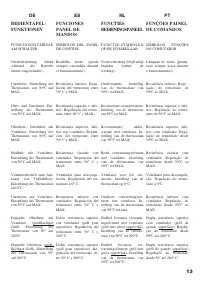
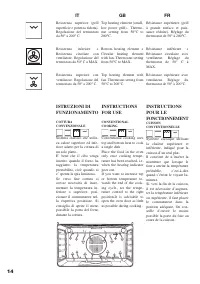
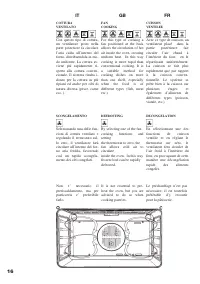
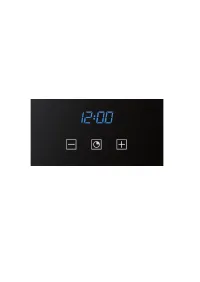
4 IT GB FR INDICE Primo utilizzo pag. 6 Pannelli autopulenti 8 Rispetto dell’ambiente 10 Frontale comandi 12-14 Istruzioni difunzionamento: - cottura con la funzione “convenzione” 14 - cottura con la funzione “ventilato” 16 - cottura alla griglia 18 Termostato 20 Timer elettronico 22 Sostituzion...
Altri modelli di forni Artusi
-
 Artusi ACSO45X
-
 Artusi AO450X
-
 Artusi AO750X
-
 Artusi AO9100MB
-
 Artusi AO960B
-
 Artusi AO960X